Homemade butter is easy, relatively quick to make and amazingly delicious. If it cost less than buying butter at the grocery store, it would be too good to be true, which is why this is not the case. All things considered, though, I still think it’s well worth it.
This stuff is precious, so I think the best use of it is not in baking, but rather, on top of freshly baked, still warm, bread, muffins or crumpets.
Are you ready for this? It’s intense.
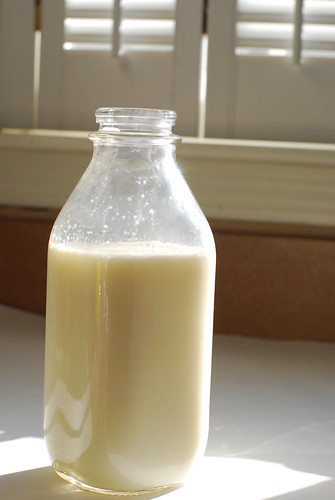
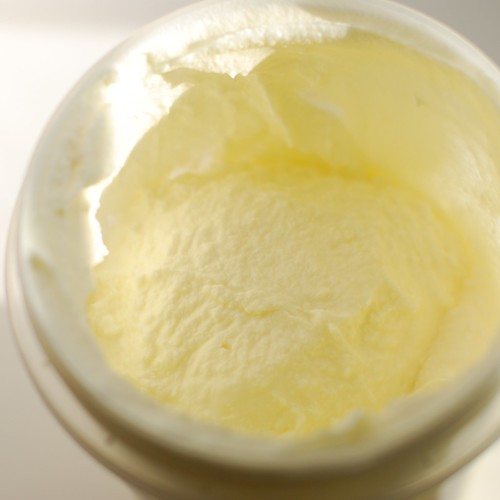
We begin with cream. I used superfresh local stuff, but the carton at the grocery store will do just as well. The important thing is to use cream at room temperature. The difference between doing this with cold cream and room temperature cream is the difference between an hour of churning and ten minutes.
Next, get a container with a tight-fitting screw-on lid that will not spurt cream all over your kitchen when you shake it vigorously. It also needs to hold at least twice the volume of the amount of cream you’re using.
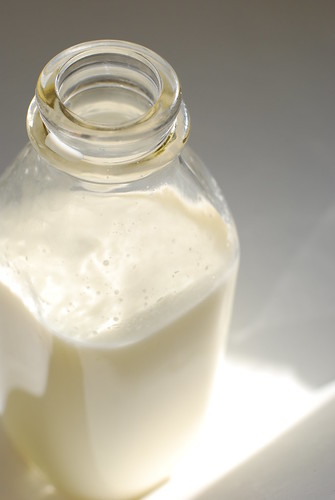
Begin shaking the container up and down in a rhythmic pattern. After 3 minutes, it’ll start feeling less like you’re shaking a jar of liquid and more like you’re shaking a jar of whipped cream, because essentially, you are.
The next 3 minutes will feel like you’re shaking a brick. This is the hardest part. You will wonder “is this doing anything?” Just keep at it.
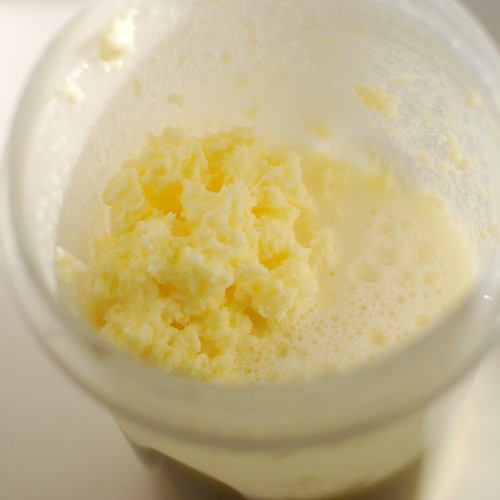
All of a sudden, within just a few shakes, the jar will begin going “shuk shuk shuk” and you’ll be able to feel the butter separating from the buttermilk. Keep doing that for about four minutes until you have lots of buttermilk in there.
Next (not pictured), cover the top of the jar with cheesecloth and pour off the buttermilk, which can be used for a great many delicious items, but most notably, all the best pancake recipes call for buttermilk. It’s a truth.
After that, let the faucet water get as cold as it gets, then fill the jar to just under the top of the butter. The water needs to be very cold, or else the butter will melt as you replace the cheesecloth and pour the water out into the sink. Repeat 7-10 times until the water drains completely clear. This cleans the butter and keeps it from going rancid as quickly as it will otherwise.
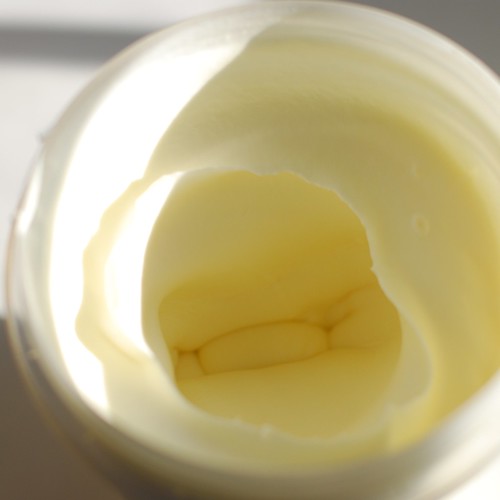
Also important is to drain the butter. I have pictures of this part.
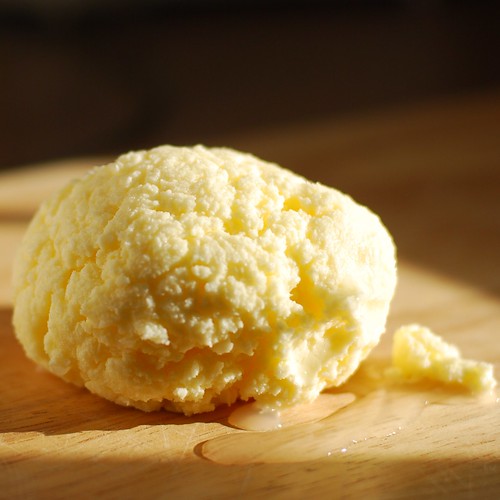
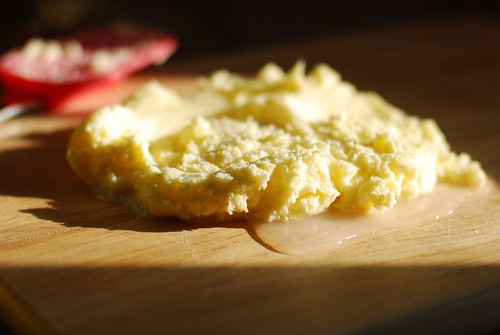
All that water puddling under the butter needs to come out. The best way is with a marble cutting board, but since I don’t have one of those, I used a wooden one. Simply squeeze the water out of the butter with a wooden spoon or spatula. The latter will double as a scraper to regroup between squeezings. To do away with the drained water, tilt the cutting board and/or use paper towels to absorb it.
If you feel like the butter is getting melty at all, just stick it in the fridge for a few minutes before going back at it.
If you want to salt your butter, add about 1/4 tsp salt and stir into your finished butter. I think the reason to do this last is that it doesn’t interfere with the draining process by absorbing water and embedding it in the butter.
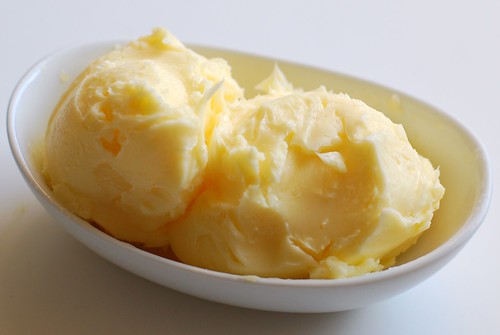
And that’s it! Beautiful, beautiful butter.
Notes
I used one pint of cream to make just under 6.5 oz of butter and almost a cup of buttermilk. These amounts will vary from batch to batch, but is a decent estimate.


Fantastic. You really do a great job explaining each step.
Thanks for sharing,
Eric
This is awesome…homemade butter. Imagine if James Bond made this? “Shaken – not stirred”!
I remember making butter in a baby food jar with a marble when I was in 1st grade…but it NEVER came out that nice! YUM!
Woo! It looks like so nice!
I wanna have a try ~~~
who new butter could be so pretty…my daughter likes to eat it by the spoonful.
but i only let her have a bit at home when i’m cooking
or as many packets as she wants if we’re out to eat and i need a minute of quiet lol
huh. who knew!! wicked cool
this is an amazing post… as soon as i saw it on foodgawker, my instant thought was “i MUST make my own butter”, LOL. maybe next time i get some fresh baked bread (my oven is D.O.A., so no baking my own *sadface*) i will do this.
i have one question, though… is it necessary to drain the butter on the cutting board or do you think that the strainer/cheesecloth/bowl method (a la draining yogurt) method would work well enough? i know it would prob take longer, but i am just curious. anyway, thanks again!
Goodness! I’m totally going to try it this weekend! This is really really awesome – I put butter on everything!
Oh, what fun. I do think this is well worth it for those special occasions when only a dollop of YUM butter will do. Gorgeous photos, Aleta!
wow that’s surprisingly simple
[...] You can do this at home?” category, Aleta over at Omnomicon.com has posted instructions on how to make home-made butter. I know it doesn’t have anything to do with gluten, but we thought it was interesting and we [...]
I’ve always wanted to make butter, it’s on my list of things to do!
this looks great! i usually drink almond milk.. you think it would work with that? make almond butter.. LOL
(i dont think so.. but its a nice thought!)
I so made this butter last night in celebration of national pancake day, and it was delicious! Thank you so much for the pictures…I was shaking it and shaking it and questioning whether or not I was doing it right, and just then it went to the “shuk, shuk” stage and I was like “omg, it’s doing it!” It was very exciting.
Isn’t making your own fun? I love making fresh butter (and yogurt) to top fresh-baked bread with! However, since I don’t have kids of my own and I’m not always into the labor-intensive, you can also churn your own butter with a sizable bowl and a hand mixer. I’m assuming you could do it with a KitchenAid and a whisk, but I’ve never tried it.. maybe I should!
In any case, I thought I should mention that the draining method (from kayce, above) does work to a very limited extent, in that it will drain somewhat, but butter has to be washed and the water squeezed out. Because of its structure (vs. yogurt) you can’t just leave it to drain on its own. It will go rancid very quickly with any remaining water and definitely won’t mold into the nice solid form we’re using to seeing. Instead of using the ‘drip’ method, squeeze your butter inside a very fine cheesecloth (so that none of that butter squeezes out with the water!). After all the water is gone and the butter is firm, you can store it for later use!
Home made butter is great.
Luckilly I don’t need to do it because the butter of the Azores is simply great
[...] original recipe called for milk alone, but since I had buttermilk leftover from making butter, I substituted buttermilk for half of the milk. This added a zingy tang to the flavour, that [...]
The reason you add the butter is to prevent it from spoiling faster. I can’t remember the exact process, or how salt impedes it, but Alton Brown told me so, and if it’s on TV, it must be true.
I’ve been making butter with my Kindergarteners for years! I started doing it for all the big holidays at home too
. I usually add some honey too.
oh sweet deliciousness!
i will be trying this very soon.
It’s good to know my marble cutting board could serve a purpose other than it’s current job as the table top for an end table. (You can’t actually cut on it or your knives are ruined…)
[...] from experience, these are FANTASTIC with some homemade butter. And also, just a smidge of apricot preserves, which I have recently come to [...]
This is incredible. I just love freshly churned butter with scones.. I’m definitely going to try out this recipe. Thank you for posting it.
Gee, I had no idea this was possible! Thank you, I can’t wait to try it.
I’ve been making butter for a long time, usually for big family dinners around the holidays. I didn’t see this in the comments already so I thought I’d give everyone a few more ideas with the unflavored butter.
I add a tiny pinch of salt and about 2 tsp. honey for honey butter. It’s slightly sweet and great with yeast rolls, bagels and steamed carrots.
I add about 1 Tbsp. Cajun seasoning to make it a bit spicy. Slather this all over sweet corn on the cob, wrap the corn in aluminum foil and twist the ends (to keep the butter inside), and grill the corn. Totally delicious.
My favorite way to make my butter is putting bunches of fresh herbs in it. Just pick what you want, chop them up, and mix them in. Its very “summery”! My fave combos are basil and sun-dried tomatoes, parsley, lemon zest, and orange zest, and cilantro, garlic, and something spicy. The spicy could be minced dried peppers or cayenne. Whatever you have around.
Hope this inspires some of you to try making homemade butter. Its sooo simple and tasty. Just be creative. There’re endless possibilities!
“shuk”, “shuk” – gotta love it!! just found your site and am LOVING it. Totally. MMMMMM. Awesome.
[...] a dessert or teatime treat.) If you really want to impress your guests, I suggest you try this homemade butter how-to. Doesn’t it look amazing? And it seems like it’s not as hard to do as it [...]
Wow, that’s amazing! I didn’t know making butter was so easy, now I have to try it!
Thanks for making it look so easy – never would have tried it otherwise. We made this today with the kids and they LOVED it!
I have an antique glass butter churn. Now I know why there are drain holes in the lid. Thank you for the great explanation!
You’re right – home made butter is brilliant, and if you buy cream in bulk when it’s reduced for quick sale it will not only be cheaper than buying – it will taste great too. You can speed up the process with a mixer – just whip double (heavy) cream until it splits…
You may want to add three marbles to the inital cream — it helps to ‘churn’ the butter more easily.
Can I use a cat instead of butter milk?
ok, I tried it – worked very well!!! We have Buttah’!!! YUM! So great, thanks for sharing!
[...] bits will get smaller and smaller, then it’ll slosh around for a little bit, and, much like the butter making process, you’ll be wondering if this will ever become anything or if you maybe messed it up somehow. [...]
After making home made butter, you could store it in a handmade butter crock.
This plus garlic would equal incredible garlic bread. What clear instructions, thanks! I read someplace on another food blog that you can make butter in a food processor, so your arm doesn’t have to get tired. Just a thought for us lazy people.
I wonder if removing the water in a salad spinner is feasible. Maybe wrapped in cheesecloth and letting it go for a ride?
There is no need to waste time using a small container and shaking it manually. I use whipping cream and a food processor. A few extra minutes past the whipping cream stage and it becomes butter. Even more simple than your idea.
I used to work in a dairy, during the christmas period, cream was shipped by the lorry load (about 25 tonnes per load).
2 days before the christmas break, the management would bin anything that would be “out of code” on the 23rd onwards.
3 years running, I just filled the car with cases of double cream (6 x 1 pint per case).
By just putting about 2 pints into the food processor and switching it on, would give me 1lb of butter, which would be bagged and put into the freezer.
a day before it’s needed, you take it out the freezer, allow it to defrost to a very pliable condition, I’d then pat it flat until it was about 1 inch thick, sprinkle salt on it (a pinch at a time) then using 2 heavy wooden spatula’s keep patting and folding it to spread the salt througout the butter.
The salt does 2 things, firstly it flavoured/seasoned the butter, but as it’s “hygroscopic”, it would also draw out any remaining tiny amounts of the “buttermilk” liquid that the food processor couldn’t “spin out”.
The only downside being that you have to sieve the “buttermilk” liquid to remove any small pieces of butter/congealed cream – and as you end up with about 1 pint of “waste” liquid from each batch, despite it tasting like very creamy milk, even having 7 cats – they get fed up with it after a while and you can only drink so much “all milk coffee”.
I was making enough for my partner and me, to last about 6 months. A nice thing to do, but labour intensive enough to be a PITA after a while……
I am definitely going to have to try this (probably with some cinnamon mixed in).
[...] looking for a recipe/technique for making your own butter and found one. I just ran across another butter churner from Omnomicon. This one is super simple in that there’s only one ingredient and no food [...]
This looks fantastic – so easy too. I’m going to give this a go!
Need to use whipping cream (35% BF) don’t you? Table cream (18% BF) won’t work will it?
I have used both heavy cream and light cream and I gotten good butter from both. My favorite to use though is organic whipping cream and definitely make sure it’s at room temp to start! I usually shake until it looks fairly solid and then I whip it with a fork so I can be right on top of the butter separating. The only problem I run into is that cream is usually more expensive than the already made butter, although you are getting some buttermilk in the bargain. And maybe I’m doing this wrong, but it seems to me that if the butter is allowed to set for a day, it actually tastes better.
I’ve just tried this out – I Stumbled it last night, and was looking for a way to use an extra carton of cream, so Bingo! It’s so easy (especially in the food processor), very tasty AND saved me throwing out the cream, which would no doubt have lurked in the fridge until way past it’s use-by date otherwise!
For really flavorful European style butter (Plugra), just add a half a pint of cultured buttermilk to a quart of heavy cream and let it sit on the counter for about 8 hours, or in the fridge for 2 or 3 days, shaking occasionally, to make sure the bacteria eats as much lactose as it can. You’ll get a very aromatic cream that then churns out amazingly rich, flavorful butter. Be sure to refrigerate it completely before churning, so the fat congeals more easily.
I also use my mixer with the whisk attachment. It takes longer than a food processor, but it turns out perfect little individual grains that rinse easily in a strainer. I let it sit in the strainer after a few good rinses, and all the remaining water drips out overnight. Easy!
wow that pretty cool
i also made it in a little Jam jar in Primary school (epic fail!!!)
could you leave it in the cheese cloth in a bowl to drain ?
seems less messy lol
I’ve been making butter for years the easy way. Put the cream in a container with a tight fitting lid, throw a couple of heavy bath towels in the washing machine, put in the jar and turn the thing on spin! Comes out every time!
I followed most of the directions (I sub’d paper towel for cheesecloth) and the butter turned out great! thanks for the step by step!
Oh my! I just made this a few moments ago. My butter bell has never seen such heaven before. I can’t wait for my boyfriend to come home from his business trip so I can make fresh bake bread and more butter. This might even call for corn bread and chili again. *drools*
This is wonderful and these directions are great – I will do this!
A great idea and well-illustrated process. I definitely want to try this. I do have a little English device that coverts butter back into cream–should you want that.
There is an error there, however. The buttermilk that separates out is called buttermilk by the industry but it isn’t. Real buttermilk is produced by fermentation of lactobacilli. Your buttermilk is simply used as animal feed, it is not very good to drink and totally useless for pancakes or buttermilk biscuits.
Check out Tried and True Recipes from a Caterer’s Kitchen—Secrets of Making Great Foods
On Amazon, Barnes and Noble, etc.
Made this today. Waited until I found heavy cream on sale for $0.50 because of the sell by date. Than it was worth the money. Fun for the kids… although my 7 year old could not shake it hard enough to get passed the whipped cream. We made garlic bread and put it on corn-on-the-cob. FUN IDEA!!!!
Fantastic instructions. I love butter and this looks fun to make.
I tend to make this 1 pint at a time in the food processor. Just walk away until you hear the motor’s sound changing. However, the process does not make for such beautiful pictures. (but my arm isn’t sore afterwards!)
This butter tastes better than any store bought kind!
Some like to “culture” their cream by dropping a spoonful of yogurt in it and letting it sit out overnight.
Great pictures! Thanks for sharing
That’s cool! thanks for posting the page.
Oh my gosh, I just did this
and it turned out fabulous.
I did exactlyyy what you said I would during the ‘brick’ stage
“Is this actually oing anything?!”
Haha
Well, it turned out lovely.
I didn’t have a cheese cloth so I just used some paper towels and it worked.
Thanks for sharing this along with very nice pictures! I’m going to have to give making butter a try some time soon now.
[...] as I always do, by googling various methods of producing butter. I found a few good sites, and used this one as a guide. The bottom line I got was that you need cream, a container of some kind (tupperware, [...]
Funny story, when on youth group trips when I was in high school, whenever we visited a restaurant we would grab all of the coffee creamers and shake them like crazy until we got butter. Or rather since they where usually cold we really only got “speckles” of butter, same idea though!
A couple of people above have tried “culturing” it with yogurt or buttermilk, what’s the classic way to culture the butter to give it the euro tang?
I tried the Whirlpool version tonight; only one spin cycle though, and I shook it the rest of the way. Used a cheesecloth and 1/4 tsp of popcorn salt. This is really fine! And it’s not that messy. Pancakes for breakfast tomorrow. Thanks for the how-to Aleta.
I have to say simply amazing! Thank you so much for posting this step by step guide and with pictures too! By the way, how do you make butter that is fat free and low cholesterols?
wow! this is a fantastic post! i had no idea it was so easy or even possible to make home-made butter. Thanks for the post!
Ahhh, reminds me of when I tricked my sister into making butter for a cake I was baking; but I was kind enough to let her use an upright mixer…
Don’t know if it’s been mentioned… but I make my butter from high fat milk, from breeds such as Jersey. Much, much cheaper than cream!!! I do it at room temperature.
I seem to spend half my life shaking a plastic bottle full of it for kids demonstrations on the farm, but also do it at home… I know lots of people on the farm will do it with an electric whisk, but I normally do it by hand (hard work!) but will chill out with it in front of the tv! Definitely worthwhile if you have the time for dinner parties etc and I do it as we don’t eat much with butter, so when we do it’s nice to have real fresh stuff
x x x
Simply beautiful
When we lived in Washington state we had a wonderful Jersey cow. Jerseys are famous for giving loads of cream. Tried an actual butter churn but it was too much work. Best method was an empty mayonnaise jar filled with that fantastic jersey cream. It was fast and it was absolutely delicious. Thanks for bringing back those great memories!
Simply amazing.. I have never made butter before but this is something I will try. What would be the advantages of making your own butter compared to store bought? Just curious…
How long does this stay good? I assume you just store it in an air tight container in the fridge? Thanks =)
I wanted to learn how to make butter and have looked at a lot of websites. But i think this one will be the one for me. I have a milk cow so i have fresh milk and now i know how to make butter. I can’t wait to try this. Thank you
I made the butter today, and it is DELICIOUS!! It was a good workout, too. Thank you for posting this recipe!
I came across your site accidentally and I never realized that butter was so easy to make this way! I’ve had friends that seemed to slave away all day in the kitchen using heavy mixer machines to make butter so I thought I’d give this a try by using a pickle jar that I washed out. It came out great!
HAha…
This is very intresting. I never new you could make butter this easy.
I think I am going to try making this. I was looking how to make it cause we have no butter at my house…
Thankss.
~Garold Port!
[...] that would be fast and would use up a ton of milk, but I was inspired by the pretty pictures in this post at Omnomicon, as well as my own curiosity in regards to the taste of breastmilk butter. Now of course, [...]
Just tried this and it worked beautifully! Took about five minutes. Shake shake shake “geez, I wonder how long this will…” shake shake THUD nothingnothingnothing sh sh shuk SHUK SHUK! “Oh. Not long at all, I guess!”
I always imagined all those poor pioneer women slaving over their butter churns. What a bunch of whiners — this is easy!
(I suppose it is remotely possible that there was a LITTLE more to it back in the day…).
[...] How to Make Butter @ Omnomicon – The first time I made butter I followed Aleta’s directions! [...]
WHEN WE WERE YOUNG, MY MOTHER UT CREAM IN A MAYONNAISE JAR AND WE USED TO ROLL IT BACK AND FORTH TO EACH OTHER IN THE KITCHEN FLOOR TILL WE HAD BUTTER!
Add A Comment