online poker

Omnomicon

say it with me now, “om nom nom”

Subscribe to Omnomicon
May-18-2009

rrr: meatloaf winner!

Posted by aleta under recipe round-robin

I am very excited to announce the winner of Omnomicon’s second Recipe Round Robin: it’s Dixie, who can now officially call herself an award-winning Recipierre! Turns out Dixie is defending her PhD thesis tomorrow, and holy crap, I can’t even imagine the pressure. But the good news is that with grad school is over, she’ll have plenty of time to pore over her prize, this 1000 page tome that I read before bed every night (true story): The America’s Test Kitchen Family Cookbook, Heavy-Duty Revised Edition

But a big ole thanks to all the Recipierres who put themselves out there with their precious family favourites (and new takes) and the Tastebuddies who eagerly made not one, but TWO meatloaves over as many weeks and shared their experiences. I’ve said it before, and I’ve no doubt it’ll be said again, but: y’all rock.

Meatloaf time!

And making my job immensely easier is Dixie’s inclusion of a really neat and awesome backstory:

I grew up eating dry, boring meatloaf that my mom (who hated cooking) made, and I believed I didn’t like meatloaf. It wasn’t until I met my grandparents in college (that’s right, until halfway through college Iwouldn’t have known them from Adam and Eve) that I experienced
meatloaf worth eating. For a while it was the only thing I could cook other than omelets, so whenever it was my turn to cook for friends or bring something to a potluck it was this meatloaf.

One of my friends is ridiculously picky and still says she doesn’t like meatloaf. Unless it’s mine.

Meatloaf time!

The truth is that I don’t care much for meatloaf either, so these were promising words! I think a lot of the success of this recipe has to do with creating a channel on the sides of the baking pan to drain the grease. Dixie’s was not the only recipe demonstrating this technique, and indeed, even America’s Test Kitchen agreed that draining grease was important. Without doing so, the meatloaf will get soggy at the bottom and that gross grey ground beef sludge will abound. Disgustingly.

Meatloaf time!

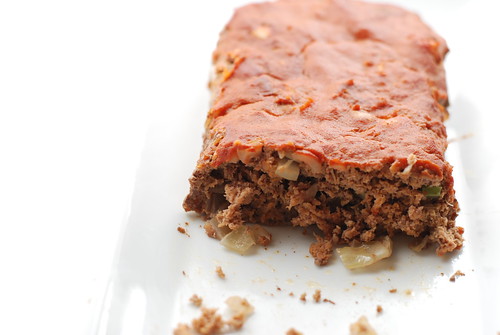
I’m a complete jerk because I just realized, like, while typing this out, that I completely forgot the breadcrumbs! Crappish! So imagine a loaf with a bit more body. I have to say, though, I was very impressed with this meatloaf. I really don’t eat meatloaf because it’s usually totally not worth the calories, but this one, somehow . . . it’s different. I saved the leftovers and didn’t feed them to my coworkers. That’s mighty praise.

The channels to success (on the side there). Meatloaf time!

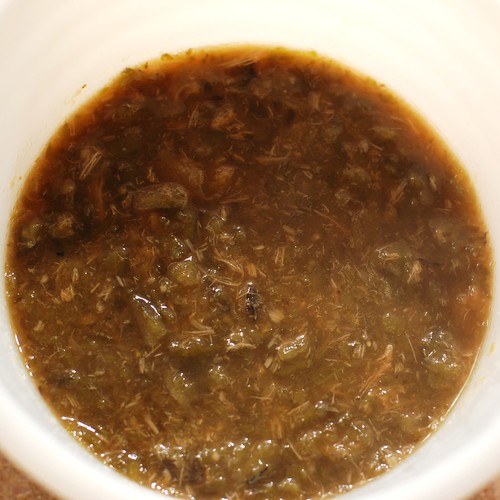
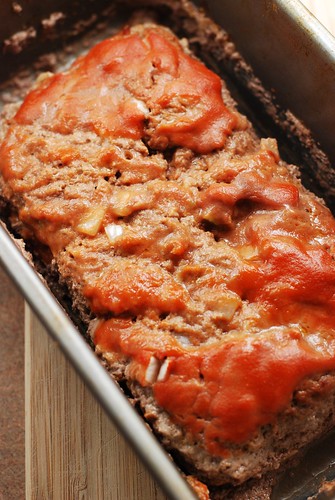
The pic on the right looks like it has an abstract face in it. If you see that too. If not, um, I must be awfully lonely tonight.

I drained like, a cup of stuff out of the meatloaf at the 45 minute mark, and it was exhilarating! Really, I suddenly felt SO much better about eating a slice of meat Wonderbread knowing that so much fat had been removed. The nice thing is that you can get the cheaper, fattier ground beef, which will baste itself as it cooks, leading to a nice tender loaf with the calorie-dense fat removed. It’s a perfect system as far as I can tell. The loaf does shrink up quite a bit; I used a 90/10 leanness, and a leaner loaf will be bigger and a fattier loaf will shrink up even more. In the future, I think I’d have used a 93/7, but any meat you want to use will do.

Meatloaf time!

I did halve Dixie’s original recipe, as hers bakes 2 lbs of beef in a 9×13 pan and I am the only one home this week. I also probably eat less than 2 lbs of beef in an entire month, so eating that much in the next week just wasn’t going to happen.

Meatloaf time!

Dixie serves her meatloaf with “garlic mashed potatoes and mushy peas,” and normally I’d go to great lengths to recreate this as it sounds so classic, but alas, peas are probably the one food I just hate hate hate and will not eat. I’m not even remotely picky about food, but peas tortured my entire childhood and I’m just not ready to move on yet. So I steamed up some green beans with almond slivers and enjoyed it that way instead.

Meatloaf time!

And my my, what a delightful loaf of meat! Thank you, Dixie, for sharing a family gem. Take it away!

Oh oh, and hey, everyone, the next Recipe Round-Robin will be announced in about a week. We’re looking for a sweet treat this time around, so feel free to use the comments on this post to not only wax poetic on Dixie’s tantalizing recipe, but also to cast your vote for what we should do next time!


My Grandfather’s Meatloaf

the loaf:
2 lb ground beef
1 stick of celery
1 onion
2 cloves of garlic
2 eggs
2 cups breadcrumbs
1 16 oz can of tomato sauce

the sauce:
2 tbsp dijon mustard
1 tbsp soy sauce (packets left over from Chinese takeout work great:
use 2 packets)
3 tbsp sugar

Preheat the oven to 325F.

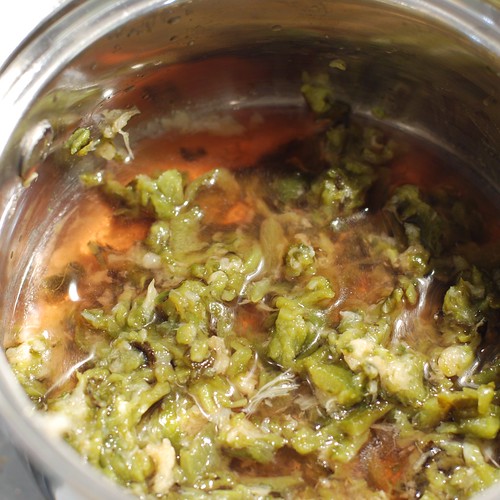
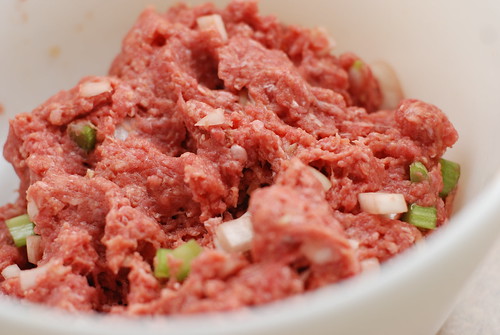
Chop the celery, onion, and garlic. The finer you chop, the more heterogeneous your meatloaf will be. You may beat the eggs before adding them to the mix, but I don’t. Combine the beef, celery, onion, garlic, eggs, breadcrumbs, and *half* the can of tomato sauce. I use my hands to squish everything together.
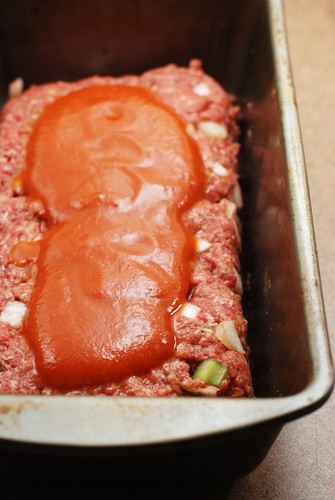
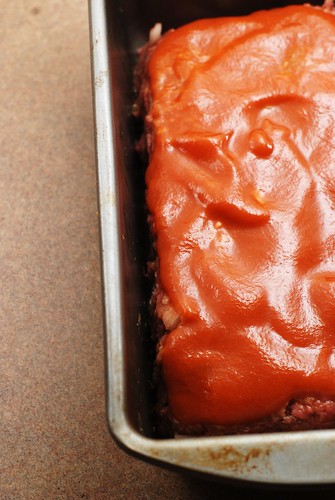
When fully mixed, place in a shallow bread tray (my grandfather used,and I still use a 13 x 9 casserole dish, having never personally witnessed a “shallow bread tray,” but I pass the term along in case you foodies have one or know where to find one). Create a channel along the sides to drain the grease.

Mix the mustard, soy sauce, sugar, and the rest of the tomato sauce in a small saucepan and heat gently. Pour half of the heated mixture over the loaf. Bake the loaf covered for 45 minutes. Take the loaf out, drain the grease. Add the rest of the sauce to the loaf and bake uncovered for 30 more minutes. Drain the
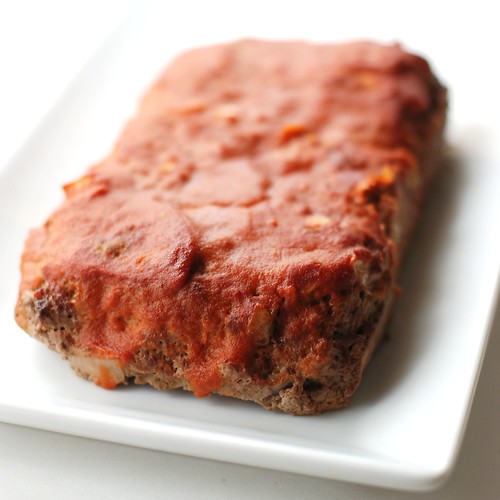
grease again. Allow the loaf to stand for 10 minutes before serving.

Meatloaf time!


nutrition summary: I have absolutely no idea. Since a lot of fat is drained out during the cooking, and having no way to quantify how much of that was actual fat and what was other juices, I really am unable to calculate calories for this dish. Given the grease draining, I’d assign this a health score of “not that bad for you.” Suggestions are always welcome.

May-4-2009

how to make hot sauce!

Posted by aleta under how to make...

Alrighty, kiddos! Today we’re making hot sauce. Yusssss! I did a bit of research, paired it with existing knowledge, and came up with this little spot of education.

Turns out that making hot sauce is a pretty inexact art, which makes it very easy to customize to your own liking. Different methods include aging, fermentation, starting with a mash, and then what I picture here, which requires thinking ahead a scant 2 hours instead of 3 years. With my lacking “planning ahead” skills, this is the only method that could possibly prove useful to me. Also, this makes a very thoughtful but inexpensive gift for most dudes.

Even “quick method” hot sauce is versatile. You can add ground spices, different mixes of peppers, unique vinegars, and create different textures all according to your preference. I went with a very simple recipe that uses jalapenos, as they are the most readily available hot pepper in my area, roasted garlic because it’s delicious, and red wine vinegar to give it some personality. My aim was a sauce with the simplicity, texture and versatility of Tabasco Sauce, but different because why else would you make your own, am I right?

Hot hot hot.

To begin with, we need to lay down some food safety rules. This is not the kind of food safety where we worry that we might undercook the egg the 1 time out of 20,000 that it contains salmonella. No no, we’re talking the kind of sure fire situation where “you’re doing it wrong” quickly becomes “fuck, my eyes!” so you want to be a little careful.

Here’s some totally excellent, completely free advice.

free advice.

Vinyl, unpowdered gloves which can be found by the hundred at your local drug store. I use these any time I cut a hot pepper ever since that time I had to dunk my nose in yogurt after a mistouch mishap. They’re cheap and disposable and well worth the investment. Without gloves, I find that fieriness has made its way under fingernails, on eyelids, in the corner of my mouth . . . pretty much anywhere I ever get a little itch. You’ll find yourself far less likely to itch with the gloves on, and when you’re done your nail beds won’t burn either. Be sure to be wearing these when you clean the knives and cutting board you use, and clean these well. End advice.

Now that we have that boring bit out of the way, we roast garlic, which takes about 45 minutes. I don’t think I have to tell you that roasted garlic is always better than garlic of any other kind.

Roasted.

It makes your house smell good and your breath smell bad. Interesting dichotomy, garlic.

Now crank on up to broil and burn up some jalapenos! Five to ten minutes each side under the broiler should do the trick, but what you’re really looking for is the skin to blister, turn black, and pull away from the body of the pepper ever-so-slightly.

Burnt, but the good kind like you want.

Roasting the jalapeno brings out a little more flavour in addition to deepening the efficacy of its spiciness, and is worth the effort. After doing so, don your gloves, peel the skin, remove the seeds, and artfully arrange with the garlic head in a florally-reminiscent display of Springtime enthusiasm.

Spicy little flower.

Okay, you don’t have to do that really, but it’s an option. What you do need to do is chop these veggies up and dump them in a pot with some vinegar.

The simmer commencement.

The story doesn’t change much for the next hour, while the mix simmers slowly with the cook’s eye upon its liquidity. If it gets too chunky, add more vinegar. In all, I used 1.5 – 2 cups of vinegar. And here’s the result.

Hot stew!

Strain as much as you like, if at all. I strained with cheesecloth in a mesh strainer 3 times for the texture pictured.

Chunk free.

And here’s our final product. The flavour is mild (about Tabasco strength), but pronounced. It comes on quickly, then recedes almost immediately, with practically no lingering. If any hot sauce enthusiasts happen to be reading, feel free to correct my terminology.

Jalapeno-garlic hot sauce.

Oh, and what good is making your own hot sauce without a little sassy branding?

<3, Aleta

Variations

Think of this as more of a method than a recipe. You can effectively make any variety of amendments to the ingredients, add extra things and substitute others. This is just a jumping-off point. Here’s a sample list of ideas—think hot sauce fusion.

“Sweet But Not Innocent” > Habanero, mango, white vinegar
“Italian Stallion” > Basil, Italian peppers (mild), cherry peppers, tomato, balsamic vinegar
“The Asiatic” > Thai chili peppers, rice vinegar (mirin), dash soy sauce

So tell me, what would your signature hot sauce be? Make it interesting. Give it a cutesy name. Any neat packaging ideas? And if you follow through and make it, let me know, I promise I’m dying to hear about it.


Aleta’s Bad Breath Hot Sauce
brought to you by Omnomicon’s own singular ingenuity

1 head garlic
10 jalapeno peppers
1.5 c red wine vinegar
1/4 tsp sugar
1/8 tsp salt (two pinches? I did two pinches)

Roast the garlic by drizzling with 1 tsp oil, wrap tightly in foil, then bake at 325o for approximately 45 minutes. If you have a better way to roast garlic, then by all means, do it that way.

Char the jalapenos. Immediately after removing the garlic from the oven, flip the heat up to broil, then char each side of the jalapenos for 5-10 minutes. See pictures for reference, but the goal is black skin that is wrinkly because it has pulled away from the pepper.

Moving along, peel and de-seed the peppers, being sure to remove the light green veins to which the seeds cling. This prevents the seeds and veins’ bitterness from marring your lovely lovely batch. Pop the roasted garlic from its papery head, using a fork or toothpick, and chop, along with the cleaned peppers.

Dump peppers and garlic into a small pot with vinegar, sugar & salt. Bring to a boil, reduce heat, and lightly simmer, uncovered & on low, for about an hour. If the sauce begins to look too chunky, add more vinegar, but note that the more you do this, the more diluted the flavour will be. If it’s cooking down too quickly (like you want to add vinegar after the first 15 minutes), try lowering the heat further.

Strain a few times with a cheesecloth-lined mesh strainer into a small bottle. I used a Johnny Walker sampler for mine, and it looked just darling. For gift-giving purposes, nip bottles make excellent, cheap packaging, with the added bonus of a shot that first requires your sip. If strained, this should last a solid 3 months—I’d recommend refrigeration just to be safe.

Makes enough for one household over the course of 3 months, a few ounces or so. As a frame of reference for larger batches, my 10 jalapenos weighed about 10 oz.

I just checked to make sure, and my posting schedule does not promise anything impressive on Sunday nights (*phew!*). It has been awfully busy in Casa Meadowlark in the last few days, and not much time to photograph all the very pretty foods created within . . . I cannot think of anything more rude than whipping out a camera at your own dinner party and taking pictures of everything. Even with extremely understanding and close friends present, it’s a big nono.

So even though all kinds of lovely foods abounded, all I really shot of Saturday night’s festivities was a bean dip I made on the fly. I had made Recipe Girl’s Chickpea and Spinach Salad with Cumin Dressing as a side, and for an appetizer-like veggie platter had in mind Creamy White Bean Dip from Bon Appétit (via Epicurious), but if you look you’ll notice that they share the majority of the same ingredients: lemon juice, lemon zest, olive oil, garlic, cumin, mint . . . all nice and thematic and essentially hummus, but these two dishes would have been a little too matchy-matchy.

Not to be put out, and still needing a fresh Spring-like veggie dip, I improvised.

Cannellini red pepper dip.

And it went over well.


Red and White Veggie Dip
comfortably serves 6 as an appetizer

1 can of cannellini beans
1/2 to 1 whole roasted red pepper (I had some jarred ones on hand, but you can roast your own if so inclined)
2 small cloves garlic, minced
2 tbsp sesame oil
1 tbsp lemon juice
1 tsp curry
1/2 tsp salt
Sesame seeds to garnish (optional, naturally)

Using a food processor, blend. Garnish with sesame seeds. In addition or as an alternative, consider garnishing with finely diced fresh red pepper (as in not roasted) in addition or as an alternative to the sesame seeds. Serve as follows.

Partial serving suggestion.

Then suddenly remember that you have some baby carrots in the fridge that might still be good. Oh, and you bought those grape tomatoes too because remember how they were on sale?

Official serving suggestion.


nutrition summary (1 serving of 6): 115 calories, 5g fat, 4g fiber; 2 Weight Watchers Points

This is the next recipe in my Family Cookbook series. This one comes from my little sister Sarah, but is actually one of my all-time favourites. When I got my first apartment in college, I also got my very first cookbook from UNH Health Services, and what do you know, it’s now online. Get the entire thing here: Good Eats! Quick & Easy Food for Busy College Students.

I love this cookbook because it’s very health-conscious in addition to focusing on budget. I would recommend it to anyone who has never really cooked for themselves, and I myself use recipes from it regularly. I’d have to say it’s the only cookbook from which I’ve made most of the recipes.

This one in particular is just wonderful. I’m still amazed at how such a simple concoction can bring joy into my life over and over again without making me fat (and oh my god it has so much fiber in it). And it only takes about 20 minutes to make. It is also extremely amendable: you can add chicken, leave out the feta, leave out the pasta, throw in other veggies you have. But really, all you need is a can of tomatoes, a can of cannellini beans, garlic, 10 oz of fresh spinach and some pasta.

Come with me . . .

Sautee your garlic on low then throw in your canned stuff. The tomatoes ought not be drained, but the cannellini need to be rinsed.

Beans and maters.

And if you didn’t use the Italian seasoned tomatoes, generously empty your spice cabinet in there (basil, oregano, kosher salt, pepper). Even if you did use the Italian stuff, you’re going to want some salt in there.

Oh heck, throw a whole buncha spices in there!

While that’s simmering, you have plenty of time to break the stems off your spinach and rinse it. And unless you used baby spinach, you really want to break off those stems, you’ll thank yourself later on.

Spinach, stemless.

Now it’s been about ten minutes, and you want to throw your spinach in there.

Throw your spinach on.

Stir that up just until the spinach wilts. In fact, the less cooked the spinach is, the better this is going to taste, so leave it on low while you stir that in. It should only take a minute or so to be done.

Cook *just* til it wilts.

You *were* cooking your pasta all the while, correct? I also include this shot as a measure of what 2 oz of penne (1 serving) looks like cooked. As a frame of reference, that bowl is exactly a cup. Needless to say, it will not be 2 oz once it’s cooked.

1 serving penne, 2 oz.

Now top with feta, if you’re doing that, and voila! A twenty-minute dinner that’s incredible in every way. I usually leave out the feta, but since B’Garah loves her cheese, I had to include it for the picture. It also makes the shot a little more attractive.

Money shot!

And that’s all she wrote.

Mediterranean Pasta
Adapted from the UNH Good Eats! Cookbook

1 tbsp olive oil
4 cloves garlic, minced or finely chopped
1-28 oz can diced tomatoes (use whole peeled if you’re leaving out the pasta)
1-14 oz can cannellini (also called white kidney beans and similar to Navy or Great Northern Beans)
1 tbsp dried basil leaves
1 tbsp dried oregano leaves
1 tbsp kosher salt
black pepper to taste
10 oz fresh spinach, stems removed
4-8 oz cooked penne (I like the Smart Taste brand best)

First, set your water to boil, and cook pasta when it’s there (which will be at some point in the middle of all this).

Sautee the garlic in the oil in a nice big pot on low for about a minute. Enter tomatoes, beans and spices. Bring to a boil, then reduce heat and let simmer, uncovered, for ten minutes while you de-stem your spinach. Now throw in the spinach and stir until it’s just wilted.

Serve atop pasta (this is a very small amount of pasta called for, there will be considerably more sauce than pasta), with feta if so desired.

Serves 4.

NOTES:
* Use a big pot because the spinach starts out really fluffy and this will give you space to stir without getting the spinach all over your stove.
* Don’t start heating your oil until the garlic is minced/chopped and ready to go, or you’ll end up with nasty bitter burnt garlic.
* Consider serving sans pasta. In this case, use the whole peeled tomatoes.
* It really doesn’t need the feta and it doesn’t need much pasta either. Honest. The spinach gets this buttery texture to it that eliminates the need for extra fat/flavour.