online poker

Omnomicon

say it with me now, “om nom nom”

Subscribe to Omnomicon

Q: What happens when you instruct your dental hygienist little sister and an Army trained cook to figure out how to make a ravioli casserole?

A:

Nothing like a ravioli casserole on a saturday night.

Magic.

Nothing like a ravioli casserole on a saturday night.

Happens.

Nothing like a ravioli casserole on a saturday night.

Part of the reason for my lapse in posting has to do with the whole rigamarole of planning something at least moderately unique and replete with a set of photographs. If this site had no photos, I’d update like, every day.

But I’ve been concocting all kinds of late-night improvisational meals and desserts and sharing only with my closest friends. Omnomicon’s mission statement is really to share dinner parties with the Internet-at-large, and so I feel like I’ve really been leaving some important guests off the list. The improvisational nature of these goodies really impede their shareability—I’m most creative around midnight, substituting everything for what I have on hand with guests gracing my living room, and I never know if it will truly come out. To photograph would be rude, and seems to jinx my success anyway.

So despite a lack of photographs, I have to share what turned out to be my most incredible late-night cheese platter to date. Use your colourful imagination to pretend that my house is impeccably kept and my serving platters not chipped. Imagine also the excellent company eccentrics such as Dano and myself might keep, and you’re probably right on.

World’s Most Incredible Improvisational Cheese Platter
intended to be served at least two hours after dessert, between the hours of 12am and 3am

Please amend according to your own stockpile of cheese & emergency guest crackers. I’ve paired the components together in the manner in which they are intended to be enjoyed, but of course experimentation is bound to occur.

1 box Water Crackers
8 oz whipped Neufchatel cheese mixed with 2 tbsp pesto concentrate (found in the fancy part of the pasta aisle in a paint-tube)

Leftover cheese from dinner, in this case, fresh mozzarella
1 tbsp leftover fig paste (just dab the mozzarella in there…this stuff can be overpowering)

Lindt Excellence Dark Chocolate Chili Chocolate bar, each square cut into four pieces
Cold tart green grapes, to cool the mouth after each piece of chocolate

Babybel cheese (the delicious little round things in red wax, just because they are hell of fun)

Ideas for variations:
Whole sugar-toasted almonds
Frozen sliced Ho-Hos (don’t laugh, they’re surprising and delicious)
Some kind of meat and earn yourself the right to call it charcuterie
Apricot jam substituted for fig paste
Make a cheese ball of the pesto cream cheese: roll in pine nuts & stick on dried cranberries


daily nom #8

If you don’t hear from me in the meantime, Happy Holidays from Omnomicon! Treat yourself to something delicious on my behalf.

<3,
Aleta

So by now we all know that milk (after a little cooking and straining) becomes yogurt, and strained yogurt becomes Greek yogurt, but if you keep straining for a little longer, you get yogurt cheese. Think fat-free cream cheese, except without weird ingredients like structuring proteins, and you can make it at home. I have no problem with chemicals, but I am a fan of simplicity, and if I can eat the same thing with less stuff in it, I’d rather.

So as it turns out yogurt cheese is called different things in different places. This foodstuff came to my attention at a Middle-Eastern restaurant where it was called “labneh,” alternately spelled “labaneh,” its Lebanese name. Indians call it “dahi,” and for some reason Wikipedia seems to think it’s the same thing as Greek yogurt. Since I do operate under the assumption that Wikipedia knows better than I, so I’m guessing that Greek yogurt is technically a particularly loosely-textured yogurt cheese. Given its recent commercialization, I will refer to Greek yogurt as the stuff you get in the store and yogurt cheese as the stuff with a texture like cream cheese.

At this point, I can’t imagine I’m spoiling anything by pointing out that this post could be alternately titled “how to make labaneh,” “how to make labneh,” “how to make dahi,” or “how to make yoghurt cheese.”

For the last few weeks I’ve been experimenting on how to get this right. Since yogurt is cheaper to get in large quantities, I’d been straining it extensively, if effort put into leaving something there for awhile can accurately be described as “extensive.” Seemed easiest to do it with a strainer.

Extensive leaving-it-there-for-awhile.

And uh, I ended up with Greek yogurt. With a strange sort of texture.

Greek yogurt that was supposed to be labneh.

I tried a few variations on this: in the fridge and on the counter, each checked every 12 hours or so and I never really got any further than Greek yogurt (for the record, on the counter is quicker). Which is all well and good, except that I can buy Greek yogurt at the store, and the quality is better, and given the yield per cup of yogurt, it costs about the same too, so as far as I’m concerned there’s no convincing argument to make Greek yogurt at home, other than maybe to try it out and get some indie cred from your more-tattooed friends.

And besides, I wanted labneh, which I can’t buy at the store, and wtf is up with the yogurt that refuses to cooperate? The entire internet agreed it only takes 24 hours to make this shit!

Just then, a little piece of my childhood reached out with a warm, knowing smile.

Stonyfield Farm's Oikos.

Alright, I lied, it was an email from someone I’ve never met who may have been smiling, but I wouldn’t know. What I do know, however, is that she works for Stonyfield Farm. I grew up going on field trips to Stonyfield Farm, as their headquarters are situated a few towns over from my hometown. I’m pretty sure that their organic yogurt was the first time I’d ever even seen the word “organic” on a foodstuff, because that trend took a little while to make it to New Hampshire. These people are trendsetters.

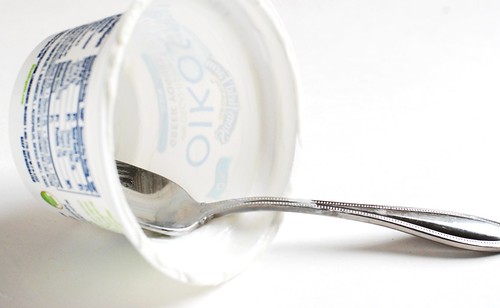
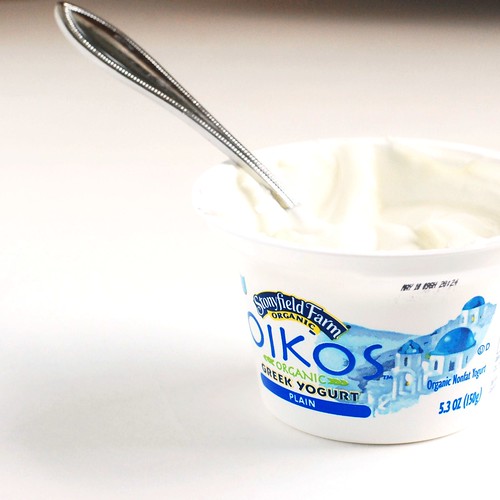
So Stonyfield wants to create some food blog buzz about their new organic, fat free, low cal, totally delicious Greek yogurt, affectionately called “Oikos” by sending along some “get it free” coupons. I was happy to accommodate for a few reasons. Excellent opportunity for a list.

  1. Food blog perks. Yay!
  2. What a convenient coincidence, I have been buying lots of yogurt lately for this labneh thing and could use the discount.
  3. I’m definitely not an organic foodie, but I am a HUGE proponent of buying local. Stonyfield Farm is a scant 50 miles from my home, which in food-source terms is my backyard.
  4. I figured out some food science.

So what do you do with Greek yogurt, other than just substitute it for regular yogurt in stuff? Well, there’s the boring but tasty “stir in some vanilla and honey” thing.

Yogurt + honey.

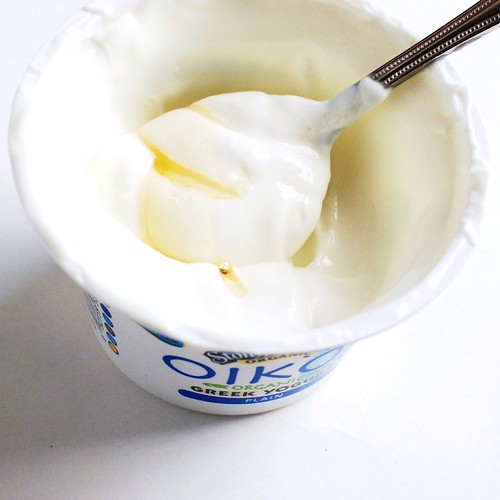
But I wouldn’t really call that a recipe. So I strained it, figuring that starting out at the Greek yogurt stage would cut my work in half and I could do a little product placement and maybe it would even work this time.

Making labneh.

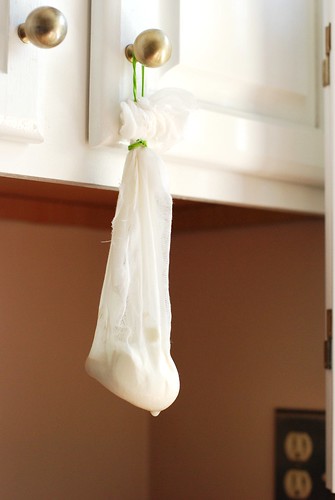
This reminds me of the stork’s creepy baby-in-a-bag thing! I do this at room temperature because it seems to work more quickly and because it’s kind of a pain in the ass to work around a big bowl in my fridge. And I mean, we’re effectively just breeding bacteria here anyway, so this method doesn’t make me all that squeamish.

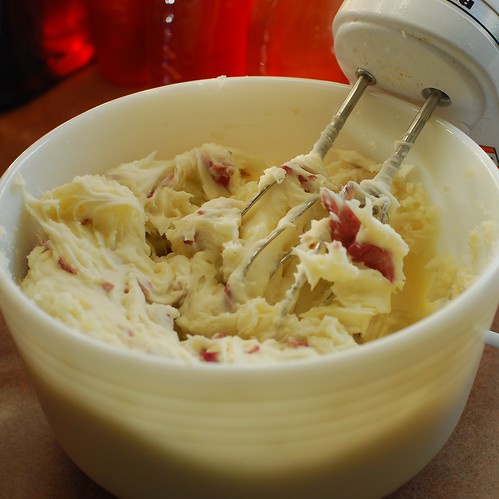
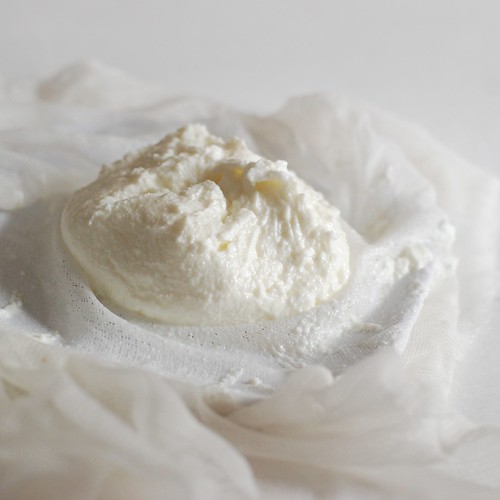
After just an overnight stint in the suggestive sling *ahem* I awoke to sheer delight. LABNEH! My quest, it was ended.

Results!

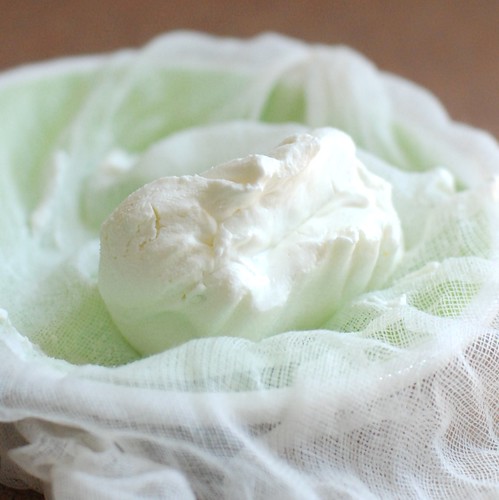
A perfect cream cheese texture . . . smooth, none of the weird pebbliness of previous attempts. I refused to believe this was just because organic is better, and compared Stonyfield’s ingredient list to that of other fat free yogurts. Turns out that Stonyfield has only milk + bacteria, whereas the other three cartons I examined included pectin or milk solids as thickeners. Now in terms of eating yogurt straight up, I don’t care if it’s thick because of milk solids or gelatin or inferior bacteria, but for my purposes here, Stonyfield worked out pretty well.

So here’s what you came for:

How to Make Yogurt Cheese

1 5.3 oz cup Greek yogurt (ingredients should be just milk + bacteria—no milk solids, pectin nor gelatin allowed!)
1 pinch salt
a piece of cheesecloth or muslin or even a very strong paper towel if you are daring
some place to suspend a leaky bag of yogurt overnight

Mix the yogurt & salt, make a bag out of the cheesecloth, then suspend it at room temperature for 8-12 hours with a bowl underneath to collect the whey as it drains off.

That’s pretty much it. Notes:

  • I use a rubber band to hang the parcel from a cabinet knob.
  • You can try this in the fridge, it will take a little bit longer.
  • And you can use regular yogurt too, but it too will take longer. Regular, non-Greek yogurt will yield about 1/3 c for every cup you use.
  • 3.5 oz of Stonyfield Farm Oikos yielded about 1/3 c yogurt cheese as well. Amount will vary depending on how long you strain and what brand of Greek yogurt you use.

Serve in one of the manners below.
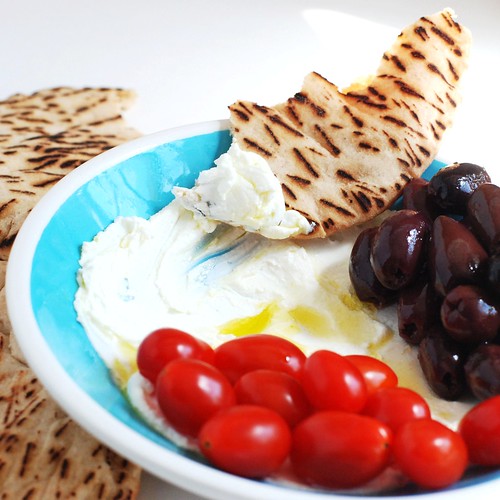
Traditional labneh.

Traditional Labneh
like how I had it at that restaurant that time

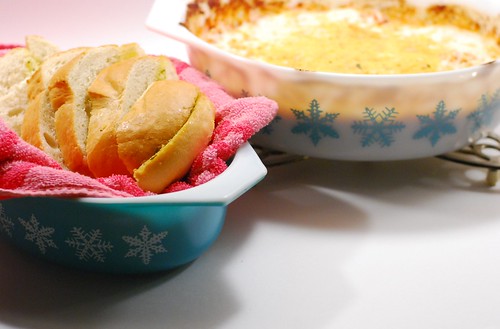
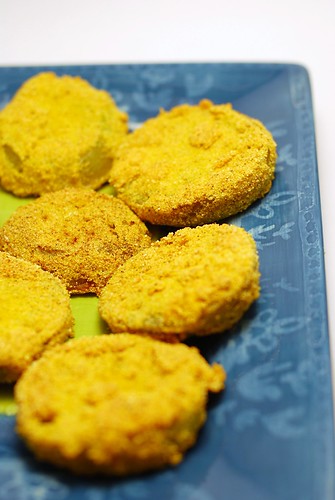
Spread some of the yogurt cheese on a plate, drizzle some olive oil atop, serve with any combination of the following: pita, olives, tomatoes, chickpeas, cucumbers, hummus, bruised mint, sprinkles of other herbs or spices. Simple but the best application I’ve found to date.

Jalapeno yogurt cheese!

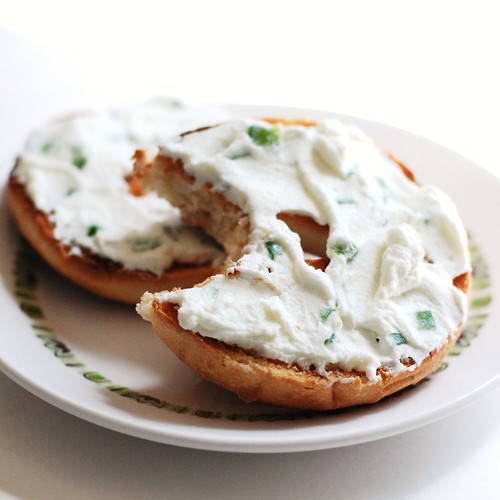
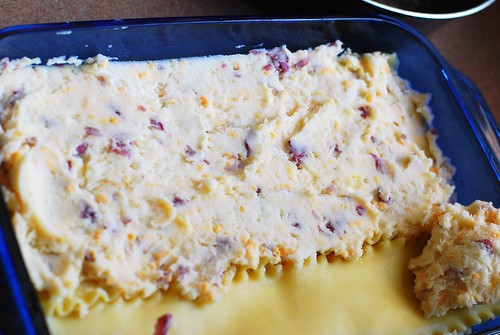
Jalapeno Yogurt Cream Cheese

1/3 c yogurt cheese (this recipe also works just fine for cream cheese if you omit the olive oil)
a drop or two of olive oil (brings out flavour)
pinch garlic powder
1/4 jalapeno, seeded and finely diced

Mix. Let mingle in fridge for a good while. Overnight would be ideal. Serve. Let me know if you try this one, I think it could use some work, but the idea is solid.

Imitation cherry cheesecake.
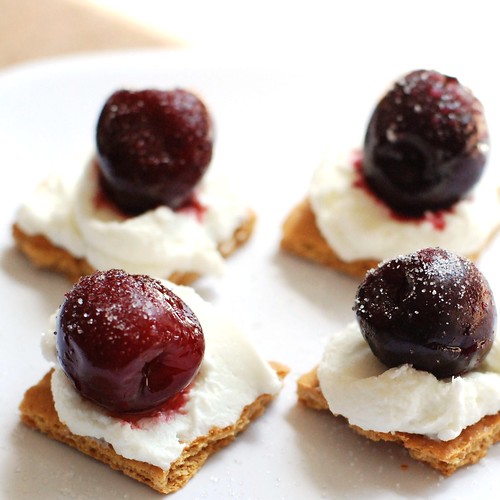
Cheaty-Pants Light Cherry Cheesecake Bites
makes just a few—eat alone or share with 1 other friend

1/3 c yogurt cheese
2-3 graham crackers (before you snap at perforation)
2 tsp sugar
2 drops vanilla extract
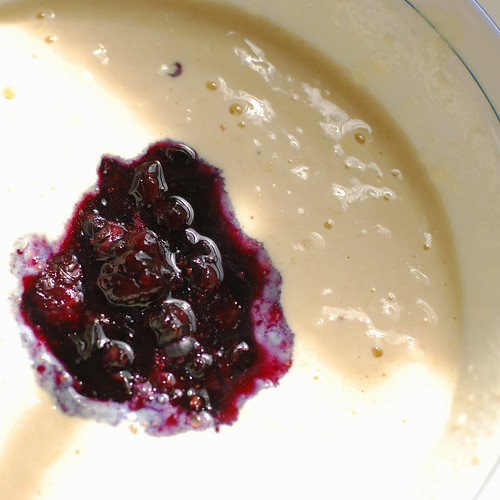
frozen cherries, thawed

Mix the yogurt cheese with the sugar and vanilla. Okay, NOW snap the graham crackers at the perforation, then slice each baby rectangle in half to make little squares. Spread a little cheesecake mixture onto each square, then top with a cherry and a little extra sprinkle of sugar. The graham crackers will get soggy very quickly, so these are not make-ahead nor party friendly. Think of it as a special private little treat to enjoy as you make them.

The end.

The one food category I seem to feed more than any other is Saturday Morning Brunch. There’s just something about waking up a little early at the very onset of two days of pure relaxation, heading to the kitchen, and waking up everyone in the house with tantalizing and familiar smells. And I’ve found that breakfast just seems to have the most universal appeal to anyone from anywhere and of any food preference. It brings together picky eaters, the hungover, old folks after church, Norwegians . . . and just minor alterations to the standard fare can accommodate virtually anyone. Even vegans enjoy animal-free bacon and dieters eat egg-white omelets, and those of us who normally shirk breakfast will always take the time to enjoy one on a sunny Saturday morning.

But there is one breakfast delicacy so simple and omnipresent, I’m aghast with myself that I’ve neglected it until now. And that’s pancakes.

In an attempt toward rainbow cake fan service, I envisioned a colourful stack of multi-coloured pancakes sans-food dye, dyed only by the beauty of the fruits therein contained. Unfortunately, berries, with the exception of the blue variety, all seem to impart pancake batter with a dingy grey that is anything but inspiring. However, cheddar cheese makes for bright cheerful pancakes that are not savoury, but instead taste extra-buttery, making for a nice complement to the traditional blueberry. Also, though I’ve mentioned before that buttermilk pancakes are best, my favourite recipe by far is the standard regular old milk-and-all-purpose flour variety.

Anyone reading this has likely made pancakes, and I’ve included a recipe at the bottom for reference’s sake, but I think I’ll let the pictures, largely, speak for themselves. Except I need to tell you a secret, and you’re going to hate me for telling you because it’s such a guilty little secret, but . . . the best way to make your pancakes with crispy edges and fluffy insides is . . . shortening. Yes, a smidge of trans-fat-laden shortening in the pan does the trick admirably.

Blueberries.

Sharp cheddar.

I’ll interrupt the silence here for just a moment: I’ve read a few places the best way to make blueberry pancakes is to put the blueberries on top of the batter once it’s in the pan to keep the whole batter from turning blue. I have no idea why anybody could look at this and not find it absolutely beautiful.

Blueberry batter.

Moving along . . .

Bubbly blueberry.Blueberry flip.

Cheddar in the pan.

Sunny sunny cheddar.

Repeat as desired.
A stack of delight.

And finally, the shot that made it all worth it. Aren’t these stripes giddily Dr. Seuss-like?

Dr. Seuss stripes.

If you don’t want pancakes right now, I just plain don’t understand you (or you just ate, which is possible).

Blueberry & Cheddar Pancakes
adapted from The JOY of Cooking

1.5 c all-purpose flour
4 tbsp sugar
1.75 tbsp baking powder
1 tsp salt
1.5 c milk (whole, lowfat, skim, it’s your call)
3 tbsp melted butter
2 eggs
1 tsp vanilla extract
1 c shredded sharp cheddar OR 3/4 c frozen blueberries, thawed, pressed, with juice.

Whisk or sift together the flour, sugar, baking powder and salt. Whisk the milk, butter, eggs and vanilla, then add to the dry ingredients. Mix just until the flour is all moistened, then stir in cheddar or blueberries; let sit for 10-15 minutes if you can spare the time . . . it seems to make the pancakes a little fluffier.

Back to that deep dark secret, shortening, which, to reiterate, makes crispy edges whilst preserving the fluffy insides. You put a smidge, about a knifetip, in the pan between each batch and you won’t regret it. However, butter or cooking spray still does the job, though not as well.

Once the pan is hot from sitting on medium-high heat (7 for fellow gas-stovers out there), drop 1/4 c of batter for each cake. Flip when the bottom is toasty and the bubbles on top aren’t popping quite as much, then remove once the new bottom is toasty.

Serve with a smile on a sunny Saturday morning.

Woo! More diner food. Get excited.

What I mean to say is “Get excited, you’re going to be one skinny bitch or dude!”

(Hey! Some of those menu items are clickable.)

Yum! The sausage is a *mite* time-consuming, but it’s delicious and easy to freezey. Here, lemme show you.

diet diner dinner: scramble & sausage

This called for a number of spices I don’t normally use, hence the unappealing array of unsightly jars. It even looks better on raw meat, somehow.

diet diner dinner: scramble & sausage

Since turkey comes in 1.25 lb packages, and since I haven’t tested the spice blend with that much turkey (I saved the extra quarter pound for a chili), I would say to use generous 1/2 tsps of the spices. Because we’re talking an extra 1/8 tsp, and my measuring spoons don’t even get that small. It’s about a pinch.

Now weigh out 1.1 oz patties. I know that’s kind of a weird size, but they were just the right size. If you don’t have a scale, divide your meat into about 12 parts. Ball up the meat, then pat it down, and stack between little squares of wax paper.

diet diner dinner: scramble & sausage

Now chill it for an hour. After the hour’s gone by, wrap whatever you aren’t going to use in saran wrap, then throw them in a freezer-safe bag in the freezer. To thaw later, microwave on high in two 10 second intervals, allowing a minute or so between nukings.

After the hour’s up, get a pan hot, then lay down a patty. Let it sit for a couple minutes, then flip. Let sit another couple minutes. Cut into one to be sure you’ve cooked all the way through (these should be rather thin, so if both sides look white, you’re probably all set).

diet diner dinner: scramble & sausage

And there you are! Money shot in a bit.

Now for the eggs. I love love LOVE egg substitute, and I use it anywhere I can get away with it. I don’t care what anyone says, for a scramble, these are fantastic. And oh so low calorie. I put a pinch of cayenne and probably a 1/4 tsp of garlic powder. Garlic powder is this amazing thing that you can put in fat free food to make it a thousand times more satisfying. You may have heard of it.

diet diner dinner: scramble & sausage

Next, some stuff to add a little fiber to your meal.

diet diner dinner: scramble & sausage

In addition to being delicious, these are lovely additions to your eggs. First you want to salt and pepper these . . . because they are particularly low-fat, the salt helps bring out a lot of otherwise neglected flavour. Sautee on medium-high for a few minutes, then set the burner to medium and lid it for another few minutes to let the broccoli get nice and tender.

diet diner dinner: scramble & sausage

Aaaaahhh!! Egg substunami!

diet diner dinner: scramble & sausage

Scramble it up in your awful pan that sticks to everything even when you use cooking spray.

diet diner dinner: scramble & sausage

You are perhaps thinking “But Aleta, I only like broccoli when its flavour is completely masked by cheese!” Have no fear, cheese-lover . . . there is such a thing as fat free shredded cheddar, and it goes on top of these eggs.

diet diner dinner: scramble & sausage

Now turn off the burner and, without moving your pan, lid it again to melt the cheese without burning the shit out of your eggs.

Mmmmmelty.

diet diner dinner: scramble & sausage

And that’s dinner.

DSC_0343

Maple Turkey Sausage
adapted from a recipe by A Taste of Home

1.25 lbs ground light turkey
1 tbsp maple syrup
One generous half-teaspoon each:
salt
onion powder
dried sage
dried thyme
poultry seasoning
nutmeg
1/4 tsp cayenne powder (plus a pinch for the adventurous)

Mix the turkey with the spices and maple syrup. Pat into tight 1.1 oz patties (about 14 total). You want these pretty thin so they don’t have to cook for very long. Layer between squares of wax paper and chill in the fridge one hour.

No no, the turkey patties, not you. Get out of there.

Heat a nonstick pan to HOT, then cook each side of the patty 2-3 minutes. Cut into one to be sure that there’s no pink in the middle.

These freeze and reheat fantastically, and I highly recommend making a month’s supply at a time. To do so, wrap each patty individually with plastic wrap, then store in a freezer bag in your freezer. They should last a good few months that way.

Easy Fo-cheesey Egg Scramble

1/2 c egg substitute

pinch of cayenne
pinch of garlic powder
1/3 c (or more) chopped broccoli
1/4 c chopped onion
1 slice packaged ham, chopped
1/4 c fat free shredded cheddar cheese
1/4 medium tomato, chopped, with the gutsy part left out, for garnish

Spray your pan with cooking spray, and heat to medium-high. Sautee the veggies until the onions start to look translucent (a few minutes), then cover the pan with a lid to help the broccoli cool.

Meanwhile, whisk the egg with the cayenne and garlic powder.

Remove the lid, turn heat to medium, and add the egg. Scramble it up. These cook pretty quickly. When the egg is no longer runny, sprinkle the cheese on top, turn off the burner, and lid the pan again to melt the cheese without burning the egg. About two minutes later, you, my friend have a cheesey egg scramble.

Just like your half-Polish, half-Italian grandmother used to make!

Everyone who’s ever had pierogies loves them. Unless they don’t like potato, cheese, pasta or butter, in which case they are clearly mad. I have yet to make pierogies, but I have a little ace up my sleeve called pierogi lasagna. It’s very easy, if time consuming.

Recovering carbophiles may wish to avert their eyes, lest they become entangled in the enticing mesh of potatoes and pasta. On the other hand, this dish is relatively low fat (remember, the butter is being distributed among 12 servings, and I found that fat free cheddar did the trick quite adequately), and they sit like a brick in your stomach, so you’re not likely to want more than one piece of the stuff.

We begin, predictably, with potatoes. These are some of the most beautiful reds I’ve seen in a long time.

Red potatoes.

The skin was so lovely, in fact, that I left it on. That’s my usual preference anyway, though.

Red potatoes: mashed.

Stir in some cheddar and sour cream. I left out the butter, for now.

Red potatoes: with cheddar.

Sautee a sliced onion in a 1.5 sticks of butter. This is why there was no butter in the potatoes.

Onion: sauteed.

Now we begin the lasagna part of all this. Spread a little onion-butter on the bottom of a 9×13 baking dish.

9x13 baking dish: buttered.

Lay down some noodles.

Noodles.

Spread potatoes little by little. It helps to drop a dollop, then spoon it out, working row by row along the noodles.

Potatoes.

And then some onions and butter on top of that.

Onions.

Repeat that a few times, then top with noodles and the rest of the butter and onions. There should be more of this stuff on top than in any of the layers.

The top!

Bake for 20 minutes and you get this.

Pierogi casserole, baked.

Use your baking time as an opportunity to fry up some kielbasa. Enjoy the hell out of it.

Mmmmmm.

Pierogi Lasagna

1 lb lasagna noodles
4 lbs red or white potatoes
1/4 c sour cream (optional)
1/2 c milk
2 c shredded cheddar cheese
3/4 c butter (1.5 sticks)
1 onion, sliced in rings

Cook the noodles. Chop potatoes into 1″ cubes, place in pot of cold water (enough to cover), and allow to come to a boil. Continue boil until potatoes are soft enough to yield to a fork stab. Drain, mash, blend with a mixer. Toss in the optional sour cream and milk, mix some more. Add salt to taste. Stir in cheddar.

Melt all the butter over medium-high heat, then sautee onion until the rings no longer hold their shape.

Preheat oven to 375. Grease the bottom of a 9×13 baking dish with some of the onion-butter. Lay noodles on the bottom of the dish, then spread the potatoes, a dollop at a time, along the length of each noodle. Once done, smooth the potatoes, then spread about a quarter of the onion on top, and drizzle a small amount of butter as well. Repeat this twice (or more if your dish can accommodate), then top with noodles and the remainder of the onions and butter.

Pop in the oven for 20 minutes. Allow to cool 10 minutes before cutting and serving.

You guys, you guys. Have you ever been to a music festival? In addition to beats, good company, crappy camping and hippies, they also feature food vendors. And this is how I discovered The Skinny Pancake, a Burlington VT original. I haven’t yet made a pilgrimage to their restaurant (Vermont is kind of a hike from Massachusetts), but they have some incredible crepes that you can recreate at home without tie-dye bedecked strangers eyeing your breakfast.

First, we have The Heartbreaker.

Nutella, you are amazing.

I think you can see where we’re going with this. My crepes are not like those served by the Skinny Pancake, but they still benefit from nutella, strawberries and bananas. And apples too . . .

Like an umami commercial.

. . . but we’re getting to that. Now mix up your favourite crepe batter.

The only acceptable use of a whisk.

And let it stand, covered with plastic wrap, for 30 mins before go time. On a side note, I fucking hate whisks, but crepes are the one food item they serve well instead of becoming a clumpy hard-to-clean nuisance. When the time is right, heat up 1/2 tsp of butter in your largest skillet, and pour enough batter to cover the bottom without the batter on top being runny.

Ooozy.

Do a little swishy swishy with your pan, and pour back to the bowl whatever isn’t stuck to the pan. When your crepe starts to bubble and the bottom of it is browned, give it a flip. This will happen a minute or two after liftoff.

Hungry yet?

Now immediately, I reiterate, immediately get about half a tablespoon of Nutella on there. You want this to get melty, and the longer it’s on your crepe, the meltier it’ll get.

Just a little bit of nutella . . .

And then toss on your strawberries and banana. You don’t want a lot of these, and you’ll see why, looks like I used about 2 strawberries and one third of a banana.

Now bananas and strawberries.

Now give that side a minute or two to cook, then begin the folding process.

Ice cream cone fold.
Triangle hat.

You want a tri-cornered hat looking thing reminiscent of colonial America. And this is the reason you want to go light on your fruits, it won’t fold up right if you aren’t conservative. Now flip that monster over for about thirty seconds to let the oozy coat the other side of the crepe.

Flip for just a moment.

Serve to your favourite breakfast guests.

DONE!

We’re almost done! The Green Mountain crepe was a big hit festivalwise as well, so I did that one too.

Apples & cheese.

Your story starts out the same, and, as with the Nutella, you wanna get your sharp cheddar slices on there immediately after flipping and for the same melty reasons.

Now the savory crepe.

Now the apples.

Tart apples and sharp cheddar. Classic.

Do your foldy bit.

Foldy fold.

And you know the rest.

DONE AGAIN!

Do you put anything cool in your crepes? Do you have an excellent crepe recipe to share? Please do! I have a feeling these are going to be a Saturday morning tradition for some time to come, and will try anything that sounds reasonably delicious.

Oct-13-2008

gourmet grilled cheeses

Posted by aleta under the comfort foodie

Grilled cheese. Mmmmm. Nothing quite like it on a rainy Sunday afternoon beside a bowl of hot soup. Or a night when mom doesn’t feel like really cooking. Crispy, gooey, warm, always fresh, eternally comforting, grilled cheeses are truly an amazing thing.

But what if I told you it could BETTER?! Yes, you heard it, better than you remember. This was Dano’s claim upon our first rainy Sunday together, and I’m all like “psh, yeah right, dude.” But he was right. The secret?

Put a little . . . spice on it, rowr!

Spices. This is my traditional grilled cheese spice mix: salt, pepper, paprika, oregano, basil and just a smidge of cayenne pepper. And what’s more, the spices add enough savour that you can make this with just a teaspoon of margarine (for the whole thing) . . .

This is what 1 tsp of margarine looks like.

. . . some light bread . . .

A life saver.

. . . and fat free cheese singles. I have a feeling a few people are going to call for my foodie resignation, but those people have not had these sammiches! You don’t have to make this light; my first experience was with thick-cut cheddar, a meaty and flavourful whole-grain bread and lots of butter. It was certainly delightful. Make your grilled cheese your favourite way, but the spices are key.

Now, there is a method to the spices. All your leafy spices go on one slice, and all your powdery ones on the other.

Flakes on one, powders on the other.

Take your knife and pretend you’re spreading more butter/margarine on there to smear all the spices in real good-like. Check out your fridge for any miscellaneous vegetables you might like on there and chop them up pretty finely. This will prevent you from burning your lips on a length of onion that drew out some damn hot cheese with it. I always use onions, tomatoes, fresh basil if I have it, and just a single slice of ham. Be generous, you’re making a sammich here!

Onion VERSUS Tomato.

And then you construct your perfect grilled cheese on medium-hot. I think the picture says it all.

Construction!

Btw, that black stuff on there is actually purple basil. I like to let my cheese cook veerrryyy slooowwwwlllyyy. You don’t have to do that. I think I just like watching it.

DSC_0750

Now no squishing with your spatula, okay? Flip!

DSC_0751

And once it’s all melty like that, you are ready to eat! Serve as one does grilled cheese.

I like to try all kinds of different mixes of things depending on what I’m eating for bread at the time and what I’m in the mood for. So with sandwich-sliced raisin bread I’ll use sage, basil, cinnamon, chili powder. With a wheat bread maybe I’ll try mace instead of cayenne. You see? Whatever you like in food, you’ll probably like on your grilled cheese. Except garlic powder, that has never quite worked out for me!

Omnom and cheese.

Grilled cheeses. Totally omonom.

Dano’s Gourmet Grilled Cheeses
highly adaptable to your liking

2 slices bread of your choice
Margarine or butter to your liking
2 slices cheese of your choice
Sliced onions, tomatoes, avocado, basil, cilantro, parsley, green/red peppers, ham, turkey, or whatever else tasty and sammich-able is in your fridge
Spices! (again, I use a generous pinch each of basil, oregano, paprika, salt & pepper, and then a tiny little amount of cayenne pepper) Also works well is chili powder, cinnamon, nutmeg, pre-made spice mixes, Tony Chachere’s, whatever’s in your spice rack.

Sprinkle your leafy spices on one slice of buttered bread, and your powdery spices on the other. Smear both sides good with your knife, just don’t get too overzealous and tear the bread.

Craft your grilled cheese over medium to medium-high heat, stacking one ingredient at a time onto the pan. Heat up some soup, keep an eye on the cheese, and enjoy when it’s all ready.

When I was a kid we visited my Uncle Doug with some frequency, and he only owned two movies from what I can remember. The first was The Good, the Bad, and the Ugly, which didn’t appeal to me for more than five minutes at a time, and the second was Fried Green Tomatoes. Yes, it is a chick flick, but it’s also a dark period film, and at the time that shit was directly up my alley. Oh, who are we kidding, it’s still up my alley.

In college, I took a food lit class and this was also on the required reading. Turns out in the book there’s a little bit more of a lesbian bent. Who knew? Whatever the case, I digress. It all comes down to I saw green tomatoes at work, and decided to try something new. In addition to the food itself, check out the results of my fancy little light box!

Look at these babies. Just beautiful, the color.

edited - fried green tomatoes

Green being my favourite colour, this was practically a religious experience visually.

edited - fried green tomatoes

This isn’t sandart, it’s just the underwhelming breading for these things.

edited - fried green tomatoes

And here they are, fried green tomatoes!

edited - fried green tomatoes

These were really just okay, which surprises me in a way, considering how much oil went into them, but not in other ways, like it’s a southern dish. I could see these being excellent with seasoned breadcrumbs, but I’m not a big fan of cornmeal without something punching it up a bit, and needless to say, the tsp of paprika really didn’t cut it. That said, I made an attempt to salvage this experiment.

edited - fried green tomatoes

Yep, you can make anything into a pretty good sammich. This one features arugula, cheddar, red onion, and mayo. My research tells me that green tomatoes are indeed just red tomatoes that haven’t had a chance to ripen yet. I thought maybe they were some kind of varietal. Maybe I’ll try fried heirloom tomatoes one of these days.

If you are interested in making your own, here’s a recipe from Epicurious.