I don’t tend to incorporate many action shots because kitchen lighting isn’t very conducive to that kind of thing. But occasionally I’ll manage a good one.


I don’t tend to incorporate many action shots because kitchen lighting isn’t very conducive to that kind of thing. But occasionally I’ll manage a good one.
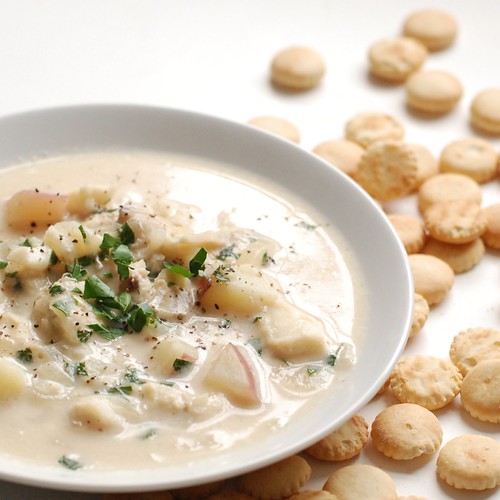
fish chowder: a milky dish made with fish!
This weekend exemplified the yang and yin of Spring around here. Saturday was a gorgeous, sunny, “drive with the window open and wear flip-flops” kinda day; on Sunday a fog rolled on the pond all day, heavy and thick even at mid-day. Both days were beautiful in their own way, and even though I know we’ll get snow one last time, I sighed with delighted relief every one of those 48 hours.
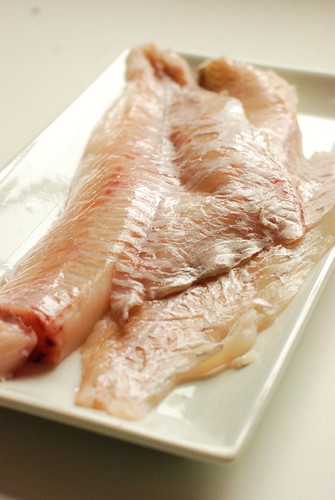
And how convenient is it that Sunday was the perfect day for fish chowder? I used Haddock because it’s cheap, standard, and what 18th-century fisherman’s wife would put in her chowder, but any white fish (or combination of fancy fishes) would work. Salmon would work marvelously, yum!
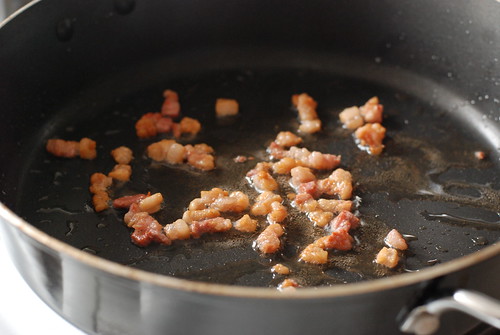
I used salt pork, but please, don’t worry about the gross unhealthiness of this because there’s not much to begin with and it’s spread among 8 servings. Really. It’s mostly for flavour. Bacon would work just as well.
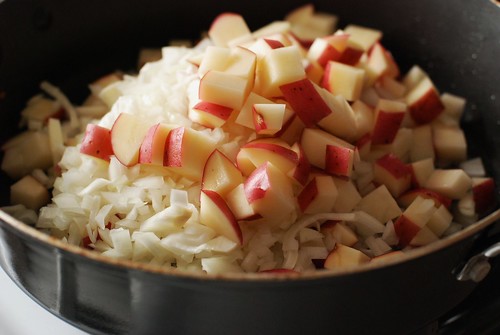
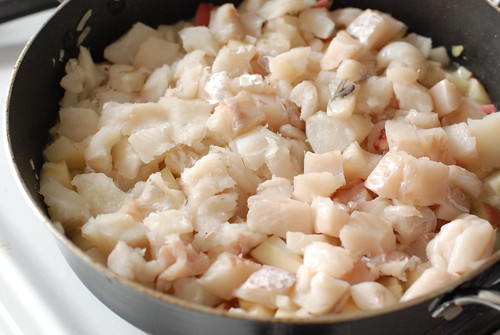
The bulk of fish chowder is vegetables, assuming you count potatoes, which I only sometimes do. Also, the only other vegetable is onion.
What’s going on here (and you can’t really see, sorry bout that) is that we made a fish broth with some of the fish, poured that into the pan with the veggies, then steamed the fish chunks atop the potatoes and onions, which are submerged in fish broth. It’s a neat way to steam fish and cook potato at the same time.
Eventually we need to move the chunky stuff to a pot, though if your skillet can handle the milk on top of this stuff, you can save yourself a pot by keep your chowder in there too.
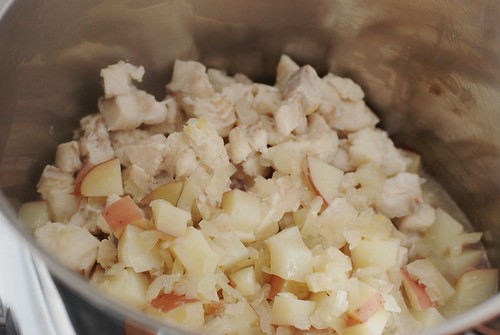
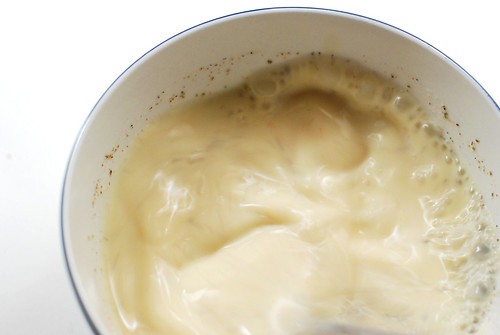
Fish is so low cal that it’s kind of a shame to serve it in a creamy soup, which defeats the purpose, right? But instead of loading up on cream, which is admittedly delicious in a chowder, I used a combination of low fat condensed and regular milk. The result is something creamier than using milk without adding any fat (which accounts for the bulk of calories in cream). I’m assuming it’s because there are more milk solids into the same amount of liquid, but my knowledge of food chemistry is slim, so I’m basing this on logic alone.
But in the end who cares? It’s a hearty and comforting way to watch the fog rolling around on the water.
Â
Â
New England Fish Chowder
adapted from a recipe by Margaret Woodworth D’Arcy of The National Society of The Colonial Dames of America in the State of New Hampshire . . . I’m not even kidding, I found this in the Society’s 1968 Cook Book
1.5 oz salt pork, diced
1 lb potatoes (about 2 medium), chopped into 1/2″ cubes
1 yellow onion, finely diced
1.5 lb haddock, about 2 fish or 4 fillets, cut into 1″ chunks
2 c water
1.5 c milk
12 oz evaporated milk
2 tsp salt
1 tsp pepper
2 tbsp butter
3 tbsp finely diced parsley, optional but quite effective
Place 1/2 lb fish (about 1 fillet) in a pot with 2 c cold water. Bring to boil and boil 10 minutes.
Once that gets going, fry up the salt pork over medium heat to extract all the fatness. Once the bits are crispy and brown, remove them and replace with diced potato and onion. Cook 5 minutes over medium-high, stirring frequently. By now the fish broth is done, so add it (and the fish if you like) to the potato and onion, then spread the cubed fish atop the veggies. Allow to steam (i.e. don’t stir) for 10 minutes, continuing on medium-high.
At this point, if you think your pan can’t comfortably handle an additional 3 cups of liquid, transfer the fish & veggies to a bigger pot. Add milk, condensed milk, salt & pepper. Bring to *almost* a boil (don’t let it bubble up big!) then reduce to medium-low, cover, and simmer about an hour.
Immediately before serving, stir in the butter, then ladle into bowls and garnish with parsley and additional pepper. The official word is that chowder is better the next day. I, however, suspect that old wives tale was created by a Mom Conspiracy way of getting us to look forward to leftovers.
Â
Â
nutrition summary (using 1% milk, fat free evaporated milk): 245 calories, 7g fat, 1g fiber; 5 weight watchers points
Now I’m going to tell you: my mother’s whoopie pie recipe is SO GOOD that I will often tell people that I don’t like whoopie pies at all, because I have yet to find another recipe that I actually like. Other people’s whoopie pies are too cakey, or too cookie-like, or (as is usually the case) the filling is pure frosting, which is WAY too sweet and totally the wrong texture altogether. My mom’s whoopie pies were famous in our circles, and she generously provided them whenever demanded, particularly when visiting my Uncle and Aunt in Maine for Thanksgiving and Christmas. I ate more whoopie pies in my childhood than cupcakes, brownies or cookies combined; they were a true and strong family tradition.
Antonia, a faithful reader, pointed to a NYTimes article about the Whoopie Pie and well hey, I’m not usually up to snuff on anything topical, and since I have an authentic family recipe on hand, I am suddenly compelled to showcase my (rather specialized) expertise!
A proper whoopie pie is not merely some cloying abomination of sugar and fat. No no, it is delicate in its way, the sweetness ever-present and yet subdued. Please do not compare them to a Devil Dog or Moon Pie. Please do not make them with cake mix and tub frosting. A whoopie pie is a very specific delicacy and there are rules.
A proper whoopie pie “cookie” is a medium-brown shade, fairly dry (not all oily and moist like a Little Debbie’s snack), but still somewhat densely cakelike, maybe a vein or two where the scoop let go of the batter. They crack ever so slightly, but sometimes they don’t and maybe that has something to do with the barometric pressure. I dunno, they still taste right and seem to have the right texture, so aesthetics aside, it’s fine either way.
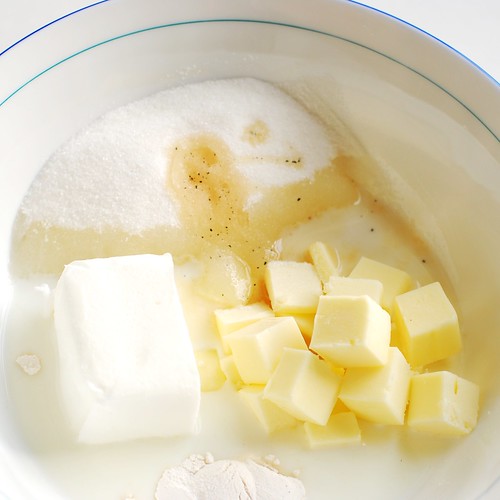
The proper whoopie pie filling is made with Crisco (which, apparently, no longer contains trans fats), butter, whole milk, sugar, a tiny smidge of flour and a regular portion of vanilla. Did you notice that it has no Fluff in it? That’s because Fluff is for fluffernutters, not whoopie pies. You will also notice that the filling is not a frosting, but a creme. While eating, one will lose all the filling out the sides and must open the pie, collect up the creme that has splooshed out back onto the bottom piece, then recreate the sandwich, only to do it all again in the next bite or two. This is the proper way to eat a whoopie pie.
This process presented many lovely photo ops. Let’s take a look!
This one reminds me of a dusty construction site.
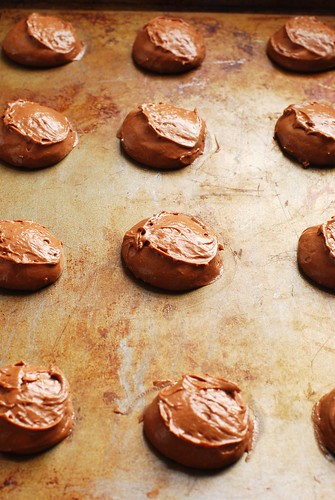
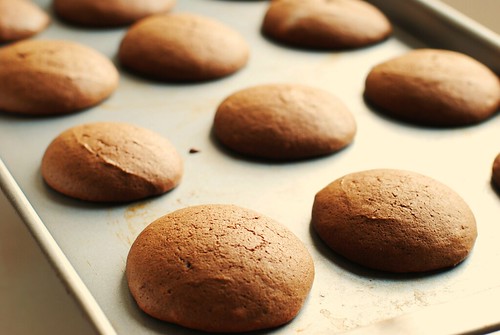
The cookies can be removed from the cookie sheet almost immediately, but you really need to use a metal spatula and carefully scrap them off. I like the texture underneath, it gets a little crispy as it cools and it is so so satisfying to snack on the odd unmatched whoopie pie cookie before they’re frosted.

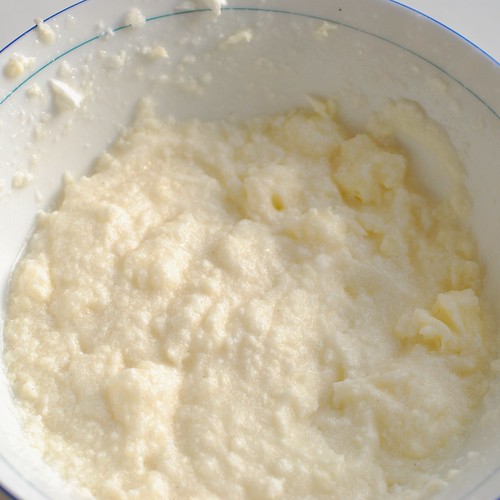
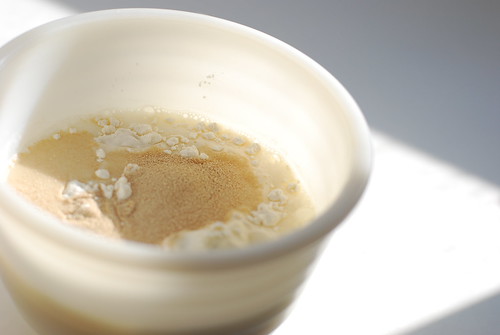
The creme takes a convenient 10 minutes to make, which you can most likely complete between the time the first batch of cookies goes into and comes out of the oven. I’ve found it nearly impossible to make the creme without an electric mixer (stand or hand, your choice), and sometimes it takes longer than others. For the first several minutes of mixing, your creme will look like this: kinda gross.
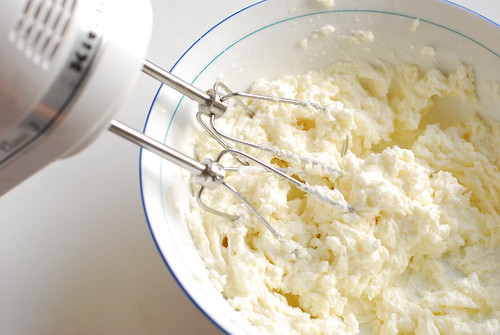
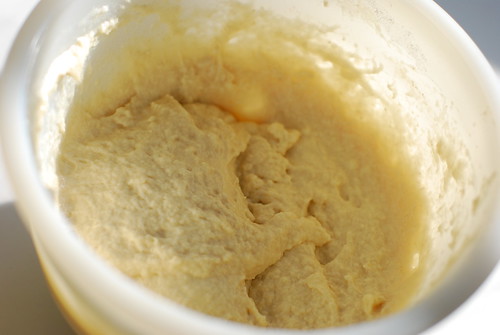
And then you’ll hear a cherub giggle, and an angel wing will brush against your shoulder as suddenly the creme whips up into this glorious appearance. The texture is extremely creamy, but still looks like this.
After a little assembly . . .
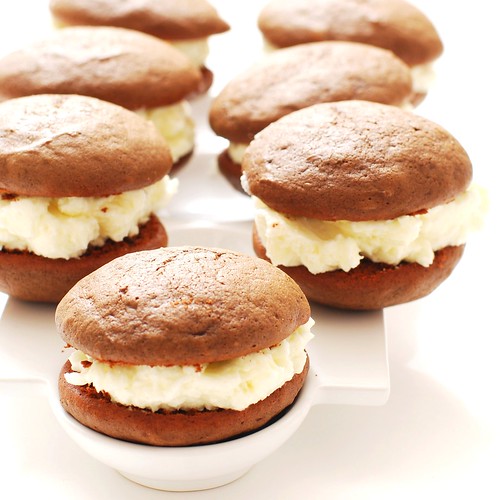
Since I started making my own food, I’ve lived on these for days at a time. Not particularly healthy nor affluent days, but certainly enjoyable ones.

Â
Â
Mom’s Famous Whoopie Pies
makes about 14 after batter & cookie sampling
brought to you by very fortunate family ties.
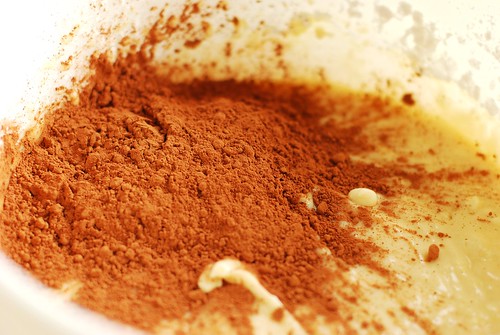
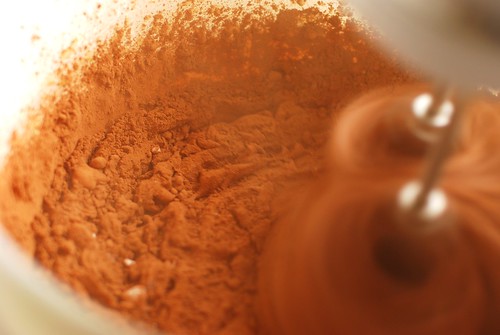
| Blend | Add |
| 1/4 c Crisco | 2 c flour |
| 1 c milk | 1/4 c + 1 tbsp cocoa |
| 1 c sugar | 1.5 tsp baking soda |
| 1 egg | 1 tsp salt |
| 1 tsp vanilla | Â |
Drop by the small tablespoonful onto an ungreased cookie sheet—a tablespoon-sized bakery scoop works best. Bake exactly 8 minutes at 375o, see if a toothpick comes out clean, and if it doesn’t, bake another 2 minutes (10 total). Upon extraction from the oven, remove from pan immediately to wire rack to cool.
Â
And now the creme filling (reminder: it’s not frosting, guys)
1/2 c margarine or butter (room temp is best)
1/2 c Crisco (my mother is insistent that this MUST be Crisco and CANNOT be generic shortening, nor substituted in any way . . . but if you do get it to work with a substitution, please let me know!)
1 c sugar
1 tbsp flour
1 tsp vanilla
1/2 c warm whole milk (20 seconds in the microwave should do it)
Beat with a mixer (stand or hand, your choice) for-freakin-ever. It will start out just like, well, lumps of Crisco floating in milk, then bits will get smaller and smaller, then it’ll slosh around for a little bit, and, much like the butter making process, you’ll be wondering if this will ever become anything or if you maybe messed it up somehow. Suddenly, about five minutes later, your mix will look weird for a second, and within moments your slushy mess will turn into a glorious white creme, smooth and perfect in a way rarely seen outside the confines of uber-processed food with chemicals you can’t pronounce that are not even available to the consumer in their pure form.
Â
Assembly
As soon as the whoopie cookies are cool, match each whoopie with its closest brother in size—even if yours didn’t all come out the same size, evenly matched whoopies will look much much nicer. Spread some filling on the flat side of one, then place the second on top. Repeat. This does not need to be done immediately before serving, as the filling tends to maintain its consistency surprisingly well, and some (like my mom) would argue that a day-old whoopie pie is even better than fresh. I like them all.
No need to refrigerate, sealed plastic or plastic wrap will keep them fresh.
. . . and that’s it. Congratulations! You just made the best whoopie pies known to man.
Â
Â
Not like it’s diet food or anything, but these are not quite as totally terrible as I thought they’d be!
Nutrition Summary (for 1 whoopie pie of yield 15): 330 calories, 17g fat, 1g fiber; 8 Weight Watchers Points
Hello friends!
Being an American, at least in my case, means wondering about the lifestyles of our elegant cousins overseas—you know, the British. Whenever an American does an impression of a Briton, they typically involve some mention of “tea and croompets!” and overexaggerate the accent with pursed lips. This makes me feel like a jerk for even mentioning, but I’m sure the British have some classic impressions of a Southern drawl that I am just dying to hear. More interesting would be an impression of an accent-neutral American reading a news report or talking about their SUV.
So when choos & chews featured some particularly lovely looking crumpets, I thought I’d give them a try.
Immediately, I ran into a problem: crumpet rings. Apparently this is something common in other areas, but not readily available in New England. I found some egg rings that would do the trick, but for $2 apiece. And then, brilliance struck: cookie cutters. Multi-functional, cheap, and way more fun than an egg ring.
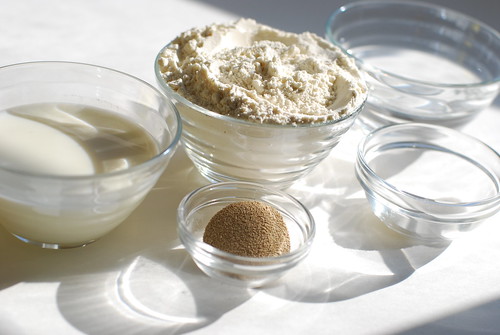
But first, the batter.
Just add yeast.
. . . and wait awhile until it becomes a bubbly, thick batter.
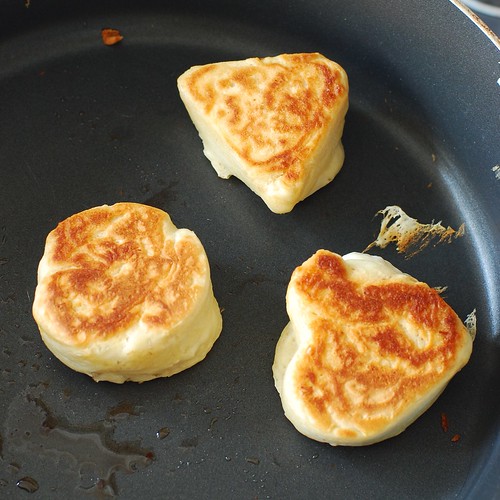
Okay, and NOW the fun begins. Because the batter is so thick, the rings are really there just to keep them from spreading too much. Butter in your shapes is pivotal.
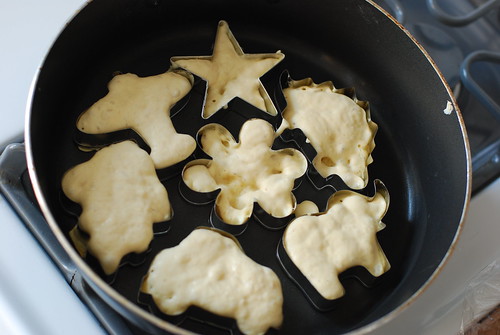
As with all things, however, there’s a catch: the more intricate shapes really just don’t cut it. Some worked out great, but it seemed to be a coincidence. I’m sad my little stegosaurus didn’t work out (he’s the one to the right there).
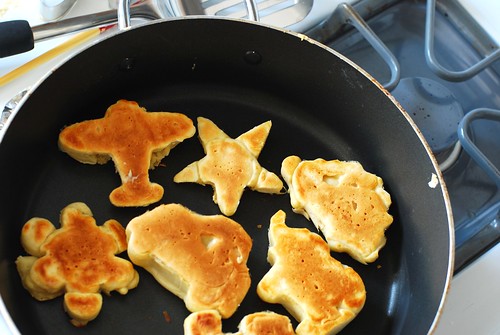
Simpler shapes worked out better.
Fortunately some of my favourites stayed intact enough for a crumpet diorama.
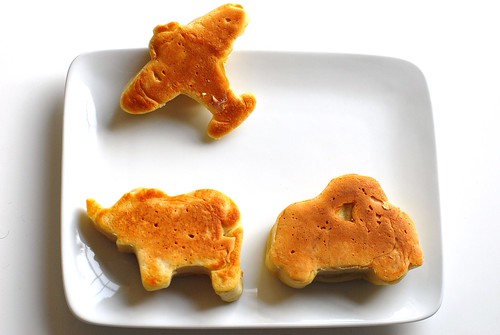
This is the childlike story being illustrated: a car fell in a ditch and an airplane flew by, so the pilot called a tow truck but they were all picking up other cars, so then an elephant walked by and said he would pull the car out. The airplane stayed in case they needed any more help.
The end.
I liked the car the best.
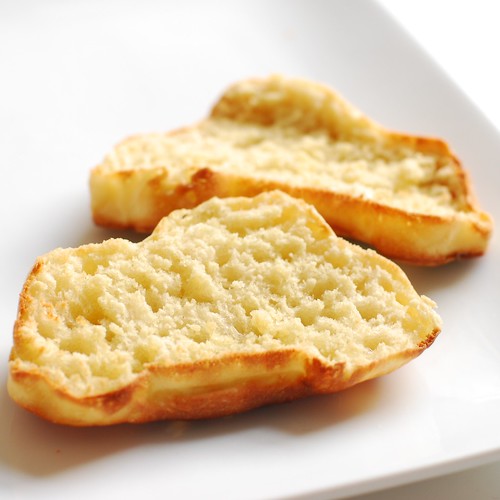
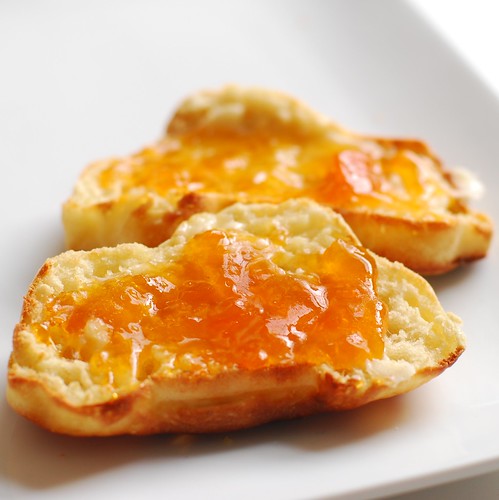
Speaking from experience, these are FANTASTIC with some homemade butter. And also, just a smidge of apricot preserves, which I have recently come to embrace.
Crumpets!
brought to me by choos & chews, but adjusted for American audiences
1.25 c flour
1/2 c milk
1 tsp instant yeast (referred to as bread machine yeast at my grocery store)
1/2 tsp sugar
1/2 tsp salt
3 tbsp water, room temperature, divided
1/4 tsp baking soda
1 tsp butter
Mix up the flour, milk, yeast, sugar and salt. Add 1 tbsp water; beat slowly for a bit, then on medium until totally smooth. Cover and let sit for an hour.
Dissolve the baking soda with the 2 tbsp water and add to batter, stirring to combine. Put the batter aside, again, for a half hour. At this juncture, it will be poofy and bubbly and thick.
Butter your crumpet rings/cookie cutters WELL, especially if you are using shapier cookie cutters. Heat pan to medium, grease with butter, place the cookie cutters in and spread batter into them about 2/3 of the way in. Don’t waste too much time trying to account for the little details of the cookie cutters, as those things are cooking and you want to be able to flip them all about the same time.
Once the bottom is browned, pop the crumpets out of their shapes and flip. Continue to cook until the new bottom is browned and cool on a rack.
Toast. Butter. Top. Eat with tea and a nod across the pond.
Hola! Como esta? Bueno!
My Spanish isn’t what it never used to be, but guess who has two thumbs and just celebrated a 25th birthday.
->this gal<-, that’s who!
I received so many wonderful gifts from my closest pals, and I include among them the gift of everyone’s presence at my karaoke bash, which is all I really wanted anyway. But SOME people (yes, I am talking about you, Erin) are apparently way the hell too cool and just had to go out and make my birthday extra-special—and I guess I can’t complain because you guys,
Check
This
Out.
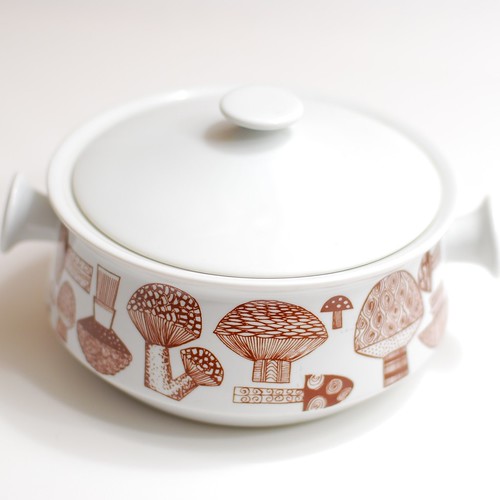
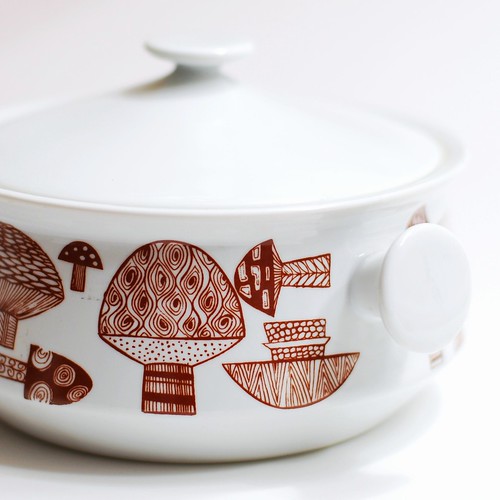
Are you frickin kidding?! Totally adorable, funky, completely vintage and all mine. So I prefer family items because what’s vintage really without a good story, right? OH WELL HEY IT CAME WITH ONE OF THOSE TOO.
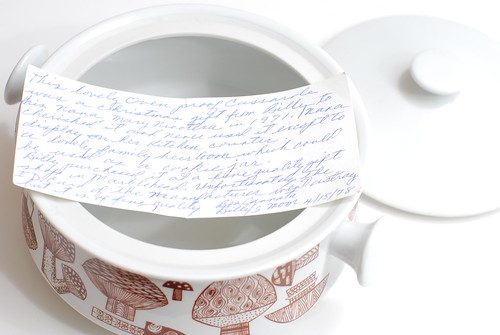
This lovely oven proof cassarole [sic] was a Christmas gift from Billy to his Nana Mary Nicotera in 1971. Nana cherished it and never used it except to display on the kitchen counter. A lovely family heirloom which could be used as a cookie jar.
Billy purchased it at a fine quality gift shop in Marblehead. Unfortunately the ID card of the manufacturer went astray but it is of fine quality.
Bea Cannata
Billy’s mom 4/15/78
I can’t even believe that I have come to own a 40-year-old piece that may or may not have ever been used, but if it has, it certainly doesn’t show. So until I find a suitable cherry-popping recipe, I will cherish it and admire the class it brings to my kitchen counter.
Thank you, Erin, for sharing the most fantastic taste of anyone I know.
So this is completely unrelated to my birthday, other than I made it the morning of receiving The Great Gift. Finnish pancakes! There’s not too much in the way of ingredients, but they all pull their weight in a crescendo of souffle-like tastiness.
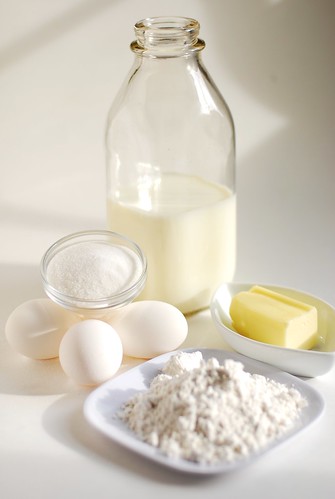
Man, that ingredient set is as white as Rhode Island.
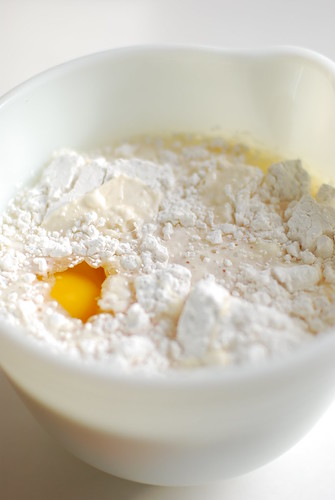
I love the egg yolk peeking out from under there. Hello, little egg yolk!
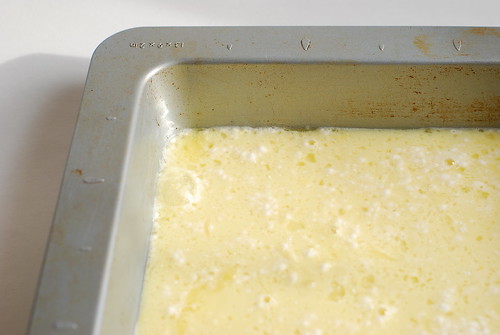
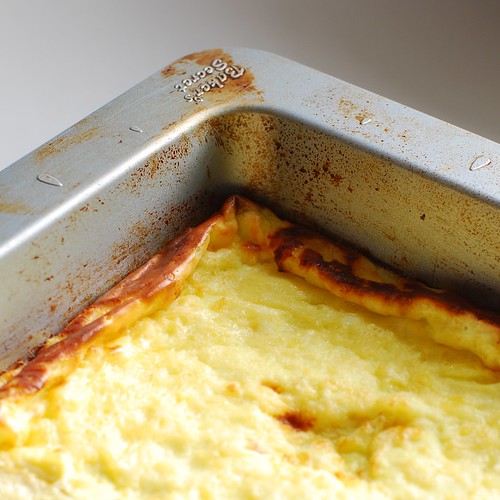
What makes pancakes Finnish is, apparently, that they are pancaked in the oven rather than the stove top. This is a great way to serve a large number of people piping hot pancakes all at once.
Serving suggestions (2).
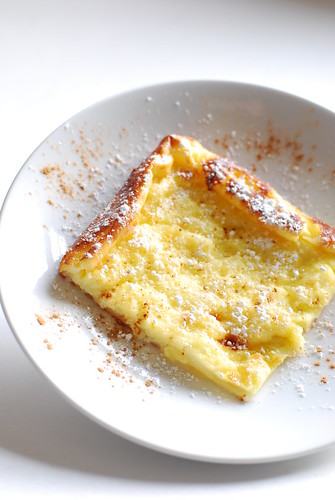

Serve with love.
Finnish Pancakes
Courtesy of Massachusetts Poultry Association, Inc.
Buy lots of eggs!!!
4 tbsp butter, melted
4 eggs
2 c milk
1/2 c flour
2 tbsp sugar
1/2 tsp salt
Preheat oven to 450o, and pour the melted butter into a 9″x16″ baking pan.
Beat eggs until foamy but not whippy, until well-blended. Beat with milk, flour, sugar and salt. Pour into pan with butter and bake 20-23 minutes.
Serve any way you like! Serving suggestions pictured include powdered sugar & cinnamon and real Massachusetts maple syrup.
Â
Â
nutrition summary: (for 1 of 8 servings, made with fat free egg substitute & skim milk) 115 calories, 6g fat, <1g fiber; 3 weight watchers points
I’m back! Did you miss me? I was all sickly and working a bunch all last week, and therefore far too lazy to even clean my house, let alone post blogs. But no worries, I have a treat.
Who doesn’t love chai tea? Hint: it is not me who does not love chai tea. I had never enjoyed this delicacy until I had a meal card in college with a chai tea machine in the food court. And it was love.
Over the summer this supply dried up, so I went to Campus Convenience (aka Campco) and inquired as to whether one might find chai tea somewhere in the store. The new owner, who was incidentally Indian, directed me to a shelf with some black tea on it. “No no, like . . . chai . . . it’s got milk and honey in it?”
“But, this is chai”
“Um, well, what I’m looking for comes in a carton?”
“Chai is an Indian word that means ‘tea.'”
“OH.”
And thus ended one of many cultural lessons that naturally befall a white middle-class suburban girl from New Hampshire sooner or later.
And look! Just five years later, here I am, so culturally learned that I not only eat Pho on a regular basis, but am making my own chai tea. There are dozens of recipes out there, so I kind of mashed them all up to create an optimal mix of things. Fortunately, my experiments in Pho leave me with pretty much all the ingredients on hand!
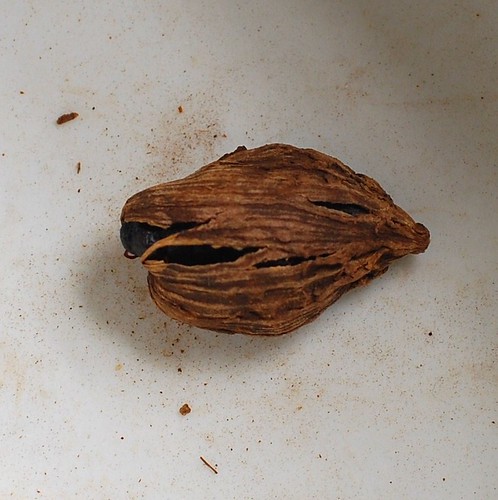
For one, cardamom pods.
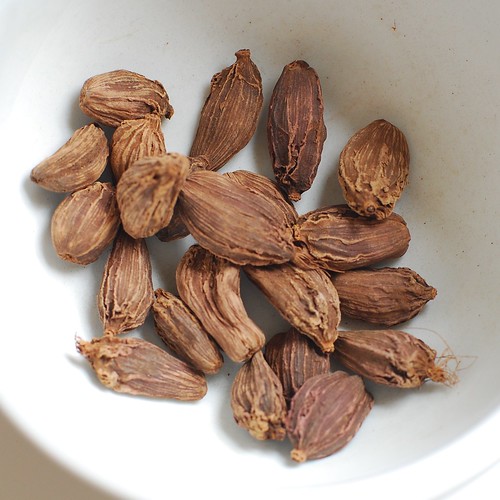
Did you know the best way to get cardamom flavouring is to smash open the pods? It’s true! I read it on the Internet. I guess outside of the pods, the seeds don’t retain their flavour very well.
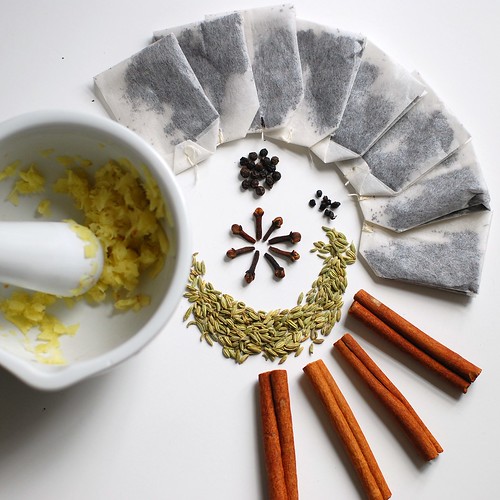
I assembled the other spices, shying not away from traditionally savoury spices such as fennel and black peppercorns.
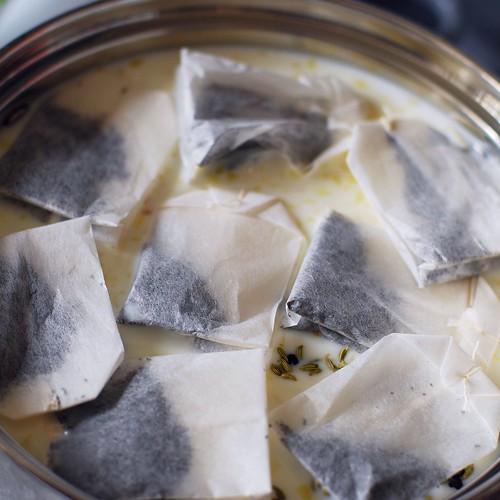
Float your tea bags atop some milk. Many folks like the creaminess of whole milk. I used 1% because the cooking of it thickens it quite a bit, and more importantly, I’m totally on a diet.
Then you stir continuously while it comes to a boil. Then you simmer. And then you simmer some more. In fact, the longer you simmer, the spicier it becomes. Perhaps less cardamom is better if you’re planning on spicing it to the max.
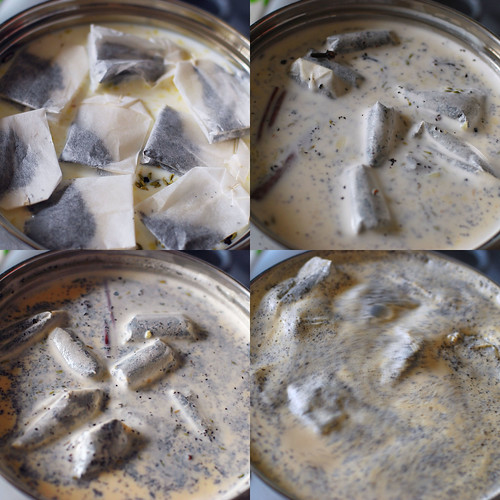
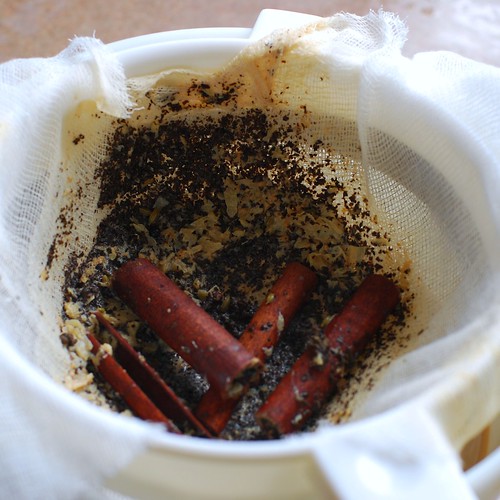
Strain. I doubly strained this because cheesecloth is a pain in the ass sometimes and also, this strainer is not nearly stringent enough to get those itty bitty tea leaves that burst out of those cheap tea bags.
After some chilling, I iced that business and enjoyed it with some fine biscuits I found at the Indian store while in search of bulk black peppercorns.

And that’s that! I made a half gallon of tea for sharing, but the recipe makes a quart.
Chai Tea
2 tsp fresh ginger, smashed via mortar and pestle or otherwise minced
4 bags of black tea
2 cinnamon sticks
1 tsp fennel seeds
4 whole cloves
8 black peppercorns
4 cardamom seeds
1/4 cup honey
1 quart of milk (your choice of fat content–that’s 4 cups)
Pour milk, spices and honey into a saucepan, float the tea bags on top, and let come to a boil while stirring continuously. Reduce to a simmer (continue to stir) and let simmer for 10-15 minutes. Simmer for longer for a stronger flavour. Turn off heat, let sit a few minutes. The milk will get a skin on top of it; skim and discard. Strain through a fine mesh strainer lined with cheesecloth if you have it. Serve hot, or chill and serve with ice. And delicious sunshine biscuits