online poker

Omnomicon

say it with me now, “om nom nom”

Oct-13-2008

gourmet grilled cheeses

Posted by aleta under the comfort foodie

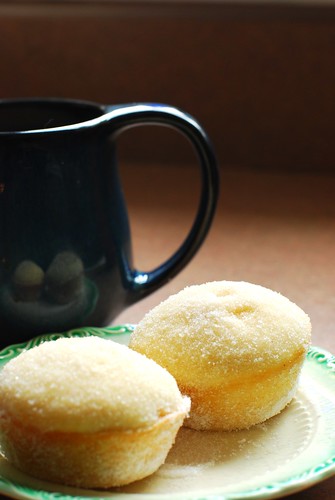
Grilled cheese. Mmmmm. Nothing quite like it on a rainy Sunday afternoon beside a bowl of hot soup. Or a night when mom doesn’t feel like really cooking. Crispy, gooey, warm, always fresh, eternally comforting, grilled cheeses are truly an amazing thing.

But what if I told you it could BETTER?! Yes, you heard it, better than you remember. This was Dano’s claim upon our first rainy Sunday together, and I’m all like “psh, yeah right, dude.” But he was right. The secret?

Put a little . . . spice on it, rowr!

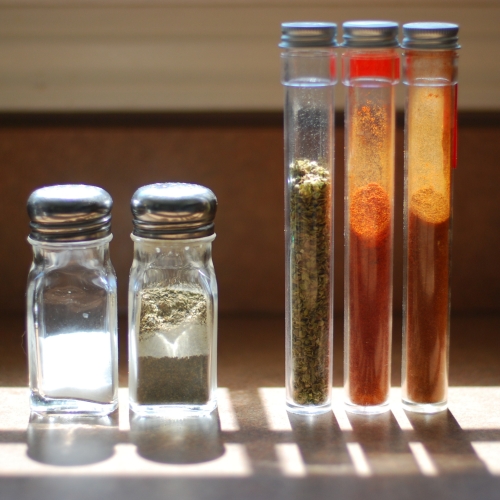
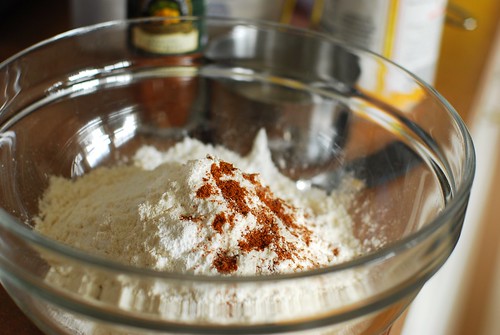
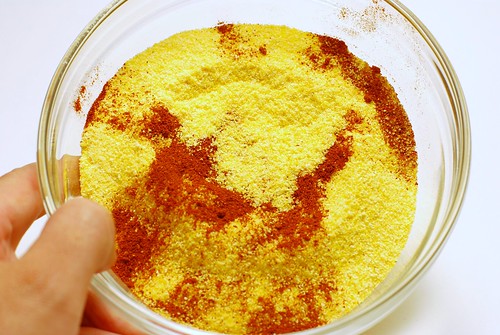
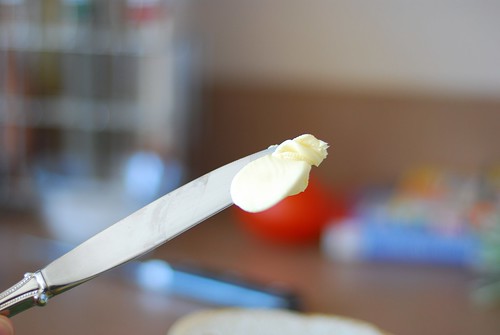
Spices. This is my traditional grilled cheese spice mix: salt, pepper, paprika, oregano, basil and just a smidge of cayenne pepper. And what’s more, the spices add enough savour that you can make this with just a teaspoon of margarine (for the whole thing) . . .

This is what 1 tsp of margarine looks like.

. . . some light bread . . .

A life saver.

. . . and fat free cheese singles. I have a feeling a few people are going to call for my foodie resignation, but those people have not had these sammiches! You don’t have to make this light; my first experience was with thick-cut cheddar, a meaty and flavourful whole-grain bread and lots of butter. It was certainly delightful. Make your grilled cheese your favourite way, but the spices are key.

Now, there is a method to the spices. All your leafy spices go on one slice, and all your powdery ones on the other.

Flakes on one, powders on the other.

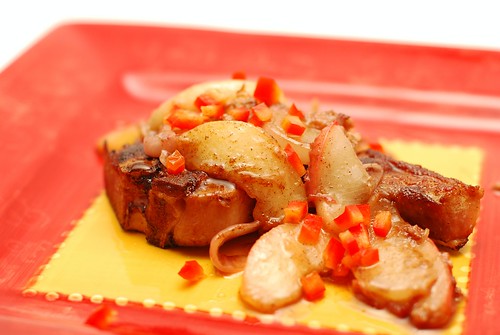
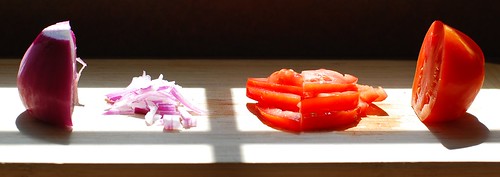
Take your knife and pretend you’re spreading more butter/margarine on there to smear all the spices in real good-like. Check out your fridge for any miscellaneous vegetables you might like on there and chop them up pretty finely. This will prevent you from burning your lips on a length of onion that drew out some damn hot cheese with it. I always use onions, tomatoes, fresh basil if I have it, and just a single slice of ham. Be generous, you’re making a sammich here!

Onion VERSUS Tomato.

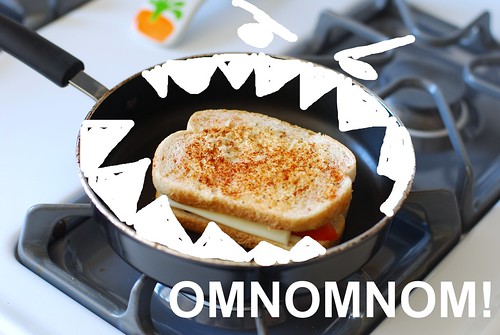
And then you construct your perfect grilled cheese on medium-hot. I think the picture says it all.

Construction!

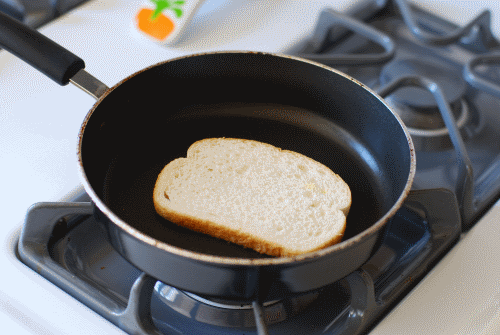
Btw, that black stuff on there is actually purple basil. I like to let my cheese cook veerrryyy slooowwwwlllyyy. You don’t have to do that. I think I just like watching it.

DSC_0750

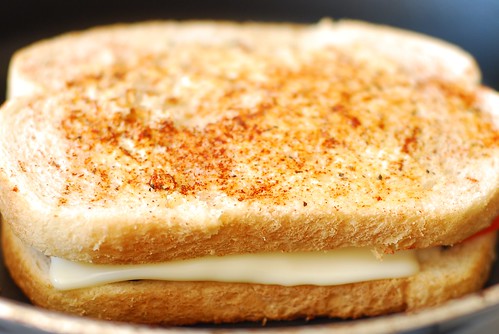
Now no squishing with your spatula, okay? Flip!

DSC_0751

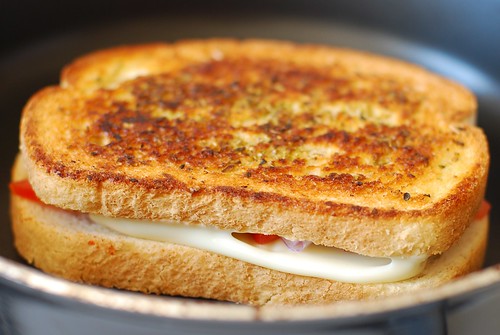
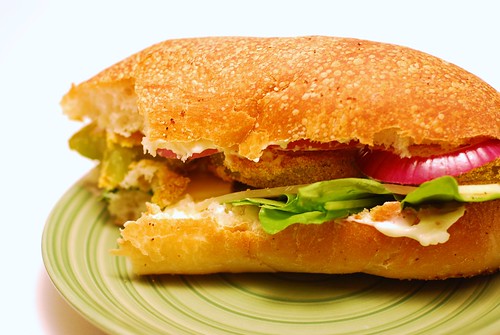
And once it’s all melty like that, you are ready to eat! Serve as one does grilled cheese.

I like to try all kinds of different mixes of things depending on what I’m eating for bread at the time and what I’m in the mood for. So with sandwich-sliced raisin bread I’ll use sage, basil, cinnamon, chili powder. With a wheat bread maybe I’ll try mace instead of cayenne. You see? Whatever you like in food, you’ll probably like on your grilled cheese. Except garlic powder, that has never quite worked out for me!

Omnom and cheese.

Grilled cheeses. Totally omonom.

Dano’s Gourmet Grilled Cheeses
highly adaptable to your liking

2 slices bread of your choice
Margarine or butter to your liking
2 slices cheese of your choice
Sliced onions, tomatoes, avocado, basil, cilantro, parsley, green/red peppers, ham, turkey, or whatever else tasty and sammich-able is in your fridge
Spices! (again, I use a generous pinch each of basil, oregano, paprika, salt & pepper, and then a tiny little amount of cayenne pepper) Also works well is chili powder, cinnamon, nutmeg, pre-made spice mixes, Tony Chachere’s, whatever’s in your spice rack.

Sprinkle your leafy spices on one slice of buttered bread, and your powdery spices on the other. Smear both sides good with your knife, just don’t get too overzealous and tear the bread.

Craft your grilled cheese over medium to medium-high heat, stacking one ingredient at a time onto the pan. Heat up some soup, keep an eye on the cheese, and enjoy when it’s all ready.

One time I tried to make fudge. From scratch. I followed my Memere’s advice and selected a dry, beautiful, sunny day (apparently fudge is THAT sensitive to moisture), and I even invested in a candy thermometer. I ended up with a grainy, lumpy, nasty mess. The next day my roommate made fudge in the microwave with a lump of marshmallow Fluff. Of course hers was perfect.

I don’t use the Never Fail recipe, but Five Minute Fudge is another workaround that comes out great every time. I’m not a big fan of chocolate, and I will eat just enough to make sure it came out, so I haven’t tried to do this from scratch. But I did get a marvelous idea last night as I drifted off to sleep.

Have you ever had one of these?

The inspiration.

If you have, you know that it is the best way to eat chocolate. I set out to recreate it in fudge form. It is necessary to chop the almonds in half, but leave the raisins whole. This seems to preserve the consistency the chocolate possesses.

Preparations underway.

Then we melt our ingredients. First, three cups of chocolate chips.

It begins.

Now ooze your condensed milk and vanilla extract in there.

DSC_0744

Melting . . .

Melting . . .

. . . and in just a few minutes of stirring, you have fudge!

Ready for additions.

Now we make like Cadbury.

Stirring in.

And voila! Lumpy fudge. I like to lightly spray the foil so the fudge releases easily when it comes time.

Lumpy!

Hmm . . . now this is the texture we’d expect, but it’s a little . . . unrefined-looking. Fortunately, while the main feature was doing its melting thang, I was also melting some vanilla chips with a little bit of the condensed milk, with more condensed milk than the fudge so that it’ll be more cooperative. And since Halloween’s upcoming, let’s make it a theme.

Meanwhile, in another pot . . .

Oh man, that reminds me of a joke. Why did Snoop Dogg carry an umbrella?

Fo’ drizzle.

Oooo!

Let that chill, harden, and cut with a nice sharp warm knife.

And now, fudge!

Cadbury’s Fruit & Nut Fudge
built on the premise of Nikki’s Five Minute Fudge

1 – 14oz can of sweetened condensed milk
3 cups milk chocolate chips (since the Fruit & Nut bar is a very milky chocolate)
1.5 tsp vanilla
Dash salt
1/2 c almonds, chopped in half
1/2 c raisins

Fo’ drizzle (optional):
1/4 c white chocolate chips
1/4 c more sweetened condensed milk

Foiled line an 8×8 pan, and spray lightly with cooking spray.

Melt your milk, your chips and vanilla in a pot on stove top. Remove from heat, stir in nuts and raisins, then pour into foil-lined pan.

If you’re drizzling, let the pan cool on your counter for a few moments while you mix the white chocolate chips with your extra condensed milk. Let cool just a minute, then pour into a plastic bag, cut a hole in the bottom, and drizzle from foil to foil.

Chill 2 to 3 hours. Put your longest non-serated cuttin’ knife in a glass of warm water, wipe dry, then slice. Re-heat your knife via the water whenever the going gets less smooth.

It’s getting chilly, isn’t it, friends? Time to bust out the belly-warming goodness of winter veggies and heavier fare.

This is yet another recipe belonging to the Family Cookbook. My Memere Rita INSISTS that she has the best beef stew recipe. Once my father made the mistake of mentioning “well, Doris [my mother] has a pretty good recipe herself,” my memere was in complete disbelief. No no, her soup was clearly the best, and none would compare.

I’m not sure how long ago this battle raged, but when my mother requested recipes of the Mater Familias, this one was sent, no doubt to prove a point. Now I love my mother dearly, and her beef stew is excellent, so I was a little defensive about the whole situation and didn’t want to like this stew. It contains veggies I’d never used before, but I went outside my comfort zone and, ironically, ended up with a new comfort food.

The broth is sweet owing to these mysterious turnips and parsnips, standard fare in many households, but not the one in which I grew up. I thought the recipe could use a bit more colour, so I threw in some celery. And oh my, if you serve this to a friend with some Tuscan bread, you may very well earn a friend for life.

Here we go! Don’t tell Memere I let the veggies get that close to the meat before it was cooked okay? Thanks dude, I appreciate that.

Roots!

Now we do the choppy chop.

Chop chop.

First step is to sear the beef. Memere wisely used the oil and butter method, in which you use two tablespoons of each. I try to keep my recipes lower cal wherever possible, but I am a meat LOVER and searing your meat on high in oil and butter is hands-down the best way to do it. For stew, it is no different.

Where's the beef?

At this point, I sauteed the onions and almost broke down and just dug in the way it is. Because there is no more amazing combination in my world than steak and onions.

Onions first.

Now we’re gonna start with our other veggies. Each is added one at a time in league with a cup or two of water. At first I was a little frustrated at the vagueness of this. “One to two cups?! Memere, just tell me how many cups already!” I think the idea is to make sure that all your veggies are at least partly in the water with each addition. Oh, and every time you add something, let it return to a boil before adding the next.

Carrots

Next carrots.

Celery

Now celery.

Turnips

And turnips.

Parsnips

And parsnips.

And potatoes!

And finally, potatoes.

Now you let this bad larry simmer for a little while and you end up with this little number here.

Warm your bones.

Wrap yourself in a blanket on the couch and enjoy!

Memere Rita’s “Back to My Roots” Beef Stew

2 tbsp oil
2 tbsp butter
1.5 lbs sirloin beef, lean cut, cut into 1/2″ cubes
1 yellow onion, chopped
4-5 carrots, peeled & sliced
4 ribs celery, sliced (editor’s addition, optional)
1 purple tap turnip, peeled & diced (I googled this term, and I think she means the small turnip. I could only find a large, so I used half of it)
4-5 parsnips, peeled & sliced
4-5 potatoes, peeled & diced

Let oil and butter get HOT on the stove, then sear beef for about two minutes. Reduce heat, add chopped onion and sautee to caramelize.

Now add each vegetable in turn with 1-2 cups hot water (just enough to cover most of the vegetables). After each addition, allow the pot to return to a boil:

Carrots
Celery
Turnips
Parsnips
Potatoes

After the potatoes, give it a good stir. I wouldn’t recommend stirring it again after it’s simmered, or your veggies will kind of fall apart in a mushy mess. Let simmer, uncovered, 30-50 minutes. Season to taste (and salt is an excellent idea here).

Serves 8 exhausted, growing farm boys. Reheats well.

Let’s make cheesecake! This one is considerably better than the Failed Pesto Cheesecake of yore. I followed a recipe from Cooking Light, and I gotta say, it’s just alright. It’s neither amazing cheesecake nor super diety, but it’s light for a cheesecake, and if you’re serious about a diet, it might be worth a shot. They used a mix of Neufchatel and fat free cream cheese, which makes it a sight more palatable than five blocks of fat free!

The cherry port sauce is what really shines. Besides the impressiveness of it being home-made, it really does beat a can of cherry pie filling in terms of richness, without being TOO rich, since it is, after all, topping a cheesecake for crying out loud. Halve your favourite cheesecake recipe to make five ramekins this size and top with ruby beauty.

It all begins with graham cracker crumbs.

After throwing in some sugar and butter, we have the makings of a crust. These ramekins are a very generous size (yours might be more modest) and don’t need to be greased because they’ll be the serving receptacle.

While that’s baking, we get going on the cheese part of this cake.

Make your own dessert sand art!

Onto the cherry topping. This is my favourite part. It’s just sugar, tawny port and two bags of cherries.

Besides making your kitchen smell lovely, if you’re anything like me, you’ll have so much fun admiring the syrup that comes of this.

After your cakes have cooled and your cherries have chilled, you, my friend, have lovely cheesecakes for your efforts. Bravo! A good idea might be to serve with the leftover port, as you’ll have almost an entire bottle left, it’s a dessert wine, and you know for sure it will complement the dessert.

Now go ahead, dig right on in.

For all interested, the recipe can be found here.

This is the next recipe in my Family Cookbook series. This one comes from my little sister Sarah, but is actually one of my all-time favourites. When I got my first apartment in college, I also got my very first cookbook from UNH Health Services, and what do you know, it’s now online. Get the entire thing here: Good Eats! Quick & Easy Food for Busy College Students.

I love this cookbook because it’s very health-conscious in addition to focusing on budget. I would recommend it to anyone who has never really cooked for themselves, and I myself use recipes from it regularly. I’d have to say it’s the only cookbook from which I’ve made most of the recipes.

This one in particular is just wonderful. I’m still amazed at how such a simple concoction can bring joy into my life over and over again without making me fat (and oh my god it has so much fiber in it). And it only takes about 20 minutes to make. It is also extremely amendable: you can add chicken, leave out the feta, leave out the pasta, throw in other veggies you have. But really, all you need is a can of tomatoes, a can of cannellini beans, garlic, 10 oz of fresh spinach and some pasta.

Come with me . . .

Sautee your garlic on low then throw in your canned stuff. The tomatoes ought not be drained, but the cannellini need to be rinsed.

Beans and maters.

And if you didn’t use the Italian seasoned tomatoes, generously empty your spice cabinet in there (basil, oregano, kosher salt, pepper). Even if you did use the Italian stuff, you’re going to want some salt in there.

Oh heck, throw a whole buncha spices in there!

While that’s simmering, you have plenty of time to break the stems off your spinach and rinse it. And unless you used baby spinach, you really want to break off those stems, you’ll thank yourself later on.

Spinach, stemless.

Now it’s been about ten minutes, and you want to throw your spinach in there.

Throw your spinach on.

Stir that up just until the spinach wilts. In fact, the less cooked the spinach is, the better this is going to taste, so leave it on low while you stir that in. It should only take a minute or so to be done.

Cook *just* til it wilts.

You *were* cooking your pasta all the while, correct? I also include this shot as a measure of what 2 oz of penne (1 serving) looks like cooked. As a frame of reference, that bowl is exactly a cup. Needless to say, it will not be 2 oz once it’s cooked.

1 serving penne, 2 oz.

Now top with feta, if you’re doing that, and voila! A twenty-minute dinner that’s incredible in every way. I usually leave out the feta, but since B’Garah loves her cheese, I had to include it for the picture. It also makes the shot a little more attractive.

Money shot!

And that’s all she wrote.

Mediterranean Pasta
Adapted from the UNH Good Eats! Cookbook

1 tbsp olive oil
4 cloves garlic, minced or finely chopped
1-28 oz can diced tomatoes (use whole peeled if you’re leaving out the pasta)
1-14 oz can cannellini (also called white kidney beans and similar to Navy or Great Northern Beans)
1 tbsp dried basil leaves
1 tbsp dried oregano leaves
1 tbsp kosher salt
black pepper to taste
10 oz fresh spinach, stems removed
4-8 oz cooked penne (I like the Smart Taste brand best)

First, set your water to boil, and cook pasta when it’s there (which will be at some point in the middle of all this).

Sautee the garlic in the oil in a nice big pot on low for about a minute. Enter tomatoes, beans and spices. Bring to a boil, then reduce heat and let simmer, uncovered, for ten minutes while you de-stem your spinach. Now throw in the spinach and stir until it’s just wilted.

Serve atop pasta (this is a very small amount of pasta called for, there will be considerably more sauce than pasta), with feta if so desired.

Serves 4.

NOTES:
* Use a big pot because the spinach starts out really fluffy and this will give you space to stir without getting the spinach all over your stove.
* Don’t start heating your oil until the garlic is minced/chopped and ready to go, or you’ll end up with nasty bitter burnt garlic.
* Consider serving sans pasta. In this case, use the whole peeled tomatoes.
* It really doesn’t need the feta and it doesn’t need much pasta either. Honest. The spinach gets this buttery texture to it that eliminates the need for extra fat/flavour.

So I generally stay away from baking recipes as they are very tempting and I can’t eat much of them, but I continually read Baking Bites as a vicarious way of enjoying baking. Nicole posted a recipe yesterday that I really couldn’t pull myself back from, and as my self control has improved to the point where I can enjoy one of something, I decided to replicate her recipe for Sugar Donut Muffins.

These are lighter than making doughnuts at home, as they are not deep fried, but they do have nutrition information that’s just barely lower fat than a Dunkie’s Sugar Raised Donut, so they’re not exactly health food. At the same time, these are delicate and divine, and will appeal to the snobbiest of food snobs (like me). They remind me of nothing so much as the sugar donuts you find in Chinese buffets. Classy, I know!

I followed the recipe to the letter for once, and the only change I recommend is waiting to brush the tops with butter until five minutes later, or leaving it out altogether. When it came time to eat these, the tops were a little soggy.

It’s go time! Check out this sugar and egg sludge I made! The texture was really cool, but unfortunately difficult to capture in photo form. So you’ll just have to make ’em to see.

Egg + sugar

The tiniest amount of nutmeg goes a long way with these.

Some dry stuff.

Swirl.

The batter starts as a dough . . .

Crumbles.

. . . then quickly goes back to being a batter.

More wet stuff.

Sloppily fill your clean, greased muffin pan that looks dirty no matter how many times you scrub it. Remember, no liners! These things still need an outside treatment.

Splats!

After baking, these babies are so smooth, they almost look more like cupcakes than muffins. But they’re neither, they’re really doughnuts, promise.

Soft little pillows.

Now take the muffins into your veiny old lady hands and roll them in sugar.

Dab dab.

It’s a satisfying part of the process. Perhaps the most.

Ta da!

The one advantage here as opposed to hitting up the Dunkie’s drive-through is that you can enjoy these with a fresh cup of unburnt coffee.

Serve with coffee, of course!

Many thanks to Nicole at Baking Bites for posting a recipe I couldn’t resist. And I find myself resisting temptations CONSTANTLY, so it’s high praise.

Heya cats and kittens! Remember when I said I was doing that family cookbook? Well, I finally got crackin, kicking it off with a recipe from my first cousin Nikki. And hey, while I’m at it I’m going to share my secret for making blueberries more pronounced in my recipes.

Nikki is maybe 6-7 years older than me (like all my cousins, my parents are both the youngest of four), and was there the day that I smashed all of my front teeth on the bike. I was 6 and have had to have lots of dental surgery since, so it’s not the fondest memory, but definitely the most memorable! She’s a very sweet gal, and I’m sad I haven’t seen her in several years owing to some missionary work she’s doing in some other country to which I’ve never been.

One of the first steps is to make a well in the middle of the dry ingredients.

Make a well in the center.

As you can see here, my "make a well in the middle of the dry ingredients" skills are wanting.

Moving right along, I decided to use frozen blueberries for my muffins, as blueberry season is over and I’m kinda broke at the moment.

Berrays.

And now, folks, is the moment in which I share my super secret blueberry method. Put your blueberries in a container for which you have a tight-fitting lid, and scoop about 2 tsp of sugar on there (per cup of blueberries).

Sugar.

Now put your lid on and shake it, shake it good. You want to coat the blueberries with the sugar. If you’re using fresh berries, I recommend shaking them with a tiny amount of water first so the sugar can stick. You’ll be left with beautiful crystallized-lookin blueberries.

Crystallizin.

Look how pretty! I feel like recipes that call for berries are always really sweet, but the berries themselves are actually pretty tart. While this is refreshing when eating them fresh by the handful, in the context of the recipes they feel, to me, a little bit like an interruption in the flavour. While the sugar-shake method doesn’t eradicate this entirely, it seems to help with a smoother flavour transition. Yes, I just made up that phrase.

Next! Gently stir ingredients and remember, just until moist. Lumpy batter will always be lighter. Then fold in the berries.

Hey batter batter.

Now the recipe says to use paper liners, but I only caught the part about liners (general category), and I don’t like liners for my muffins at all because it gives the bottoms an excuse to get soggy as they cool. The result is a pan of batter, some of which is in foil wrappers, the rest of which are in none. I wanted to be able to present the muffins as written, and though I failed, the liners attest to my best intentions. Also, note how I got my grubby little fingers in the bowl before I even took the shot. Mmmmm, batter!

Oh oh and I almost forgot! I read a really good idea somewhere (that I forgot while making the muffins): save some blueberries to put right on top of the muffins just before you put them in the oven. This will better distribute the berries all around (instead of just sunk at the bottom).

Licked clean.

Now for the last shot. I took like a bajillion trying to show the muffins as appetizingly as possible, and survey seems to say that this shot is best. And of course I like it because I’m a slave to low f-stops.

Muffin invasion.

But since I had to crop to a square, this one ended up in the book.

Torn.

So there you have it! The first of my paternal family’s recipe collection.

Nikki’s Low Sugar Berry Muffins

1 3/4 cups sifted flour
1/4 cup sugar
2 1/2 tsp baking power
3/4 tsp salt
1 well-beaten egg
1 tsp vanilla
1/3 cup vegetable oil or melted shortening
3/4 cup milk
1 cup berries

Preheat oven 400 degrees.

Directions:

Sift dry ingredients in bowl and make a well in center. Add in wet ingredients and stir until moist. Fold in fruit and nuts, if desired, to taste.

Fill paper lined muffin pan 3/4 full. Bake 35 minutes.

Yield: 12 Muffins

Sep-21-2008

roasted squash soup

Posted by aleta under for veggie-heads

Excited about winter squash, I wanted to make a pumpkin soup. I couldn’t find any recipes, so I tried to adapt a mishmash of recipes online for butternut squash soup. So uh, here’s a little documentation of the process.

I started off with more ingredients than I ended with.

Ingredients

I mean, look how beautiful!

The beauty of butternut.

The pumpkin gave me a hard time, and was much more difficult to make photogenic. The guts, however, are just so darn pretty.

Guts!

I then prepared these to roast for an hour.

I love cobalt.

Post-roast, we make a squash smoothie that looks here suspiciously like a mango smoothie of some kind.

Mango smoothie?

I couldn’t get a good shot of both brands of soup, but I promise, they look the same and the butternut was way better. It didn’t even need the maple syrup I thought might give a nice layer of flavour.

Sewp!

In addition to being a bit time-consuming, this recipe will also leave your kitchen a total mess. But Dano ate it until he couldn’t any more and ranted and raved and, I assure you, has no problems being harsh when he doesn’t like something. So maybe it’s just not for everyone? It is super healthy and flavourful and I don’t think there’s any fat in this. So there are certainly redeeming qualities here!

The mess.

Here’s the recipe I ended up with after all my experimentation. Thanks, Epicurious!

Last night we had paper_wings and her husband over for a proper dinner party. It went to so well! They make for truly great company. In advance, I mentioned that I was going to make pork chops to Dano and he expressed concern over the fact that every pork chop he’d ever had managed to be too dry while somehow also being too oily. Usually I agree, but I knew there must be a way, and I discovered it!

I had an idea to make, rather than an apple sauce topping, a peach topping that would take advantage of the peach season in Massachusetts (ongoing). Unable to find the perfect recipe, I set out to create my own.

edited - pork chops

We begin with a brine. Lacking brown sugar, I improvised some out of sugar and molasses.

edited - pork chops

After adding some liquids in there, simmering and letting cool, submerge the chop.

edited - pork chops

Let that chop soak for a good hour, rinse, pat dry. Now heat up some oil and butter on high (yes, high) until very hot, then sear each side of the chop for 1 minute each.

edited - pork chops

Now flip again (to the original side) and cover. Lower the heat to medium-low, cover, and simmer for five to seven minutes.

edited - pork chops

Then remove. Your porkchop will be tender, juicy, fully cooked and absolutely delicious. Now my first recipe involved creating a chutney, so my final result looked like this.

edited - pork chops

But the chutney, despite having onions and garlic in there, tasted an awful lot like apple sauce. And honestly, if I wanted that old standby, I’d just have done that. So my goal was to create something that tasted gross by itself and yet better complemented the chops.

This time your sauce doesn’t start while the chop is brining, but rather, after you’ve removed it from heat and loosely covered with foil to let it rest. It begins with the pan we were just using.

edited - pork chops

Sautee onions and garlic for a few minutes, then toss in the peaches with some allspice along with a dash or two of this and that (see recipe). You’ll notice this time I tried white peaches, but while they are probably more refreshing fresh, they’re not sweet enough for these purposes. So if you want to take my advice, use yellow peaches.

edited - pork chops
edited - pork chops

Now top your chop with this revised sauce. Drizzle with a small amount of maple syrup, then sprinkle finely diced red peppers for a little bit of a colourful pop!

edited - pork chops

It seemed to go over well. =)

Peachy-Keen Porkchops!

Brine

1/3 c kosher salt

1/3 c brown sugar (or 1/3 c white sugar + 1 tbsp molasses)

3 slices of peeled ginger (use a carrot peeler)

1/2 tsp whole cloves (about 14)

1/2 tsp whole pepper

2 c apple juice

2 c water

1 lb thickly sliced pork chops (this seems to work out to about two 1-1.5″ chops)

1 tbsp butter

1 tbsp oil (with a high burning point, i.e. no olive oil)

Combine salt, sugar, ginger, cloves, pepper, apple juice and water in a small pot; cook over medium heat until boiling and sugar & salt has dissolved. Cool completely. You can opt to leave out 1 cup of the water then add it as ice later on to speed up the cooling of it, which I also do in the freezer because I’m impatient and have no regard for the quality of my frozen foods.

Soak the chops for 1 hour, making sure they are submerged. Weight if necessary (as pictured above). Rinse & pat dry.

Heat up a tablespoon each of butter and oil in a large pan over high. Get it nice and hot. Toss in your chop (carefully, it will definitely splatter), sear 1 minute, turn, sear 1 minute, turn, cover, turn the stove to medium-low and let sit for 5-7 minutes. Remove to a plate and cover loosely with foil to let the meat rest.

Peachy-Keen

1 yellow onion, sliced into rings

2 cloves garlic, pressed

2 peaches, sliced

1/2 tsp ground allspice

splash white wine vinegar

splash lemon juice

light drizzle of real maple syrup (maybe 1 tbsp total)

1/4 red pepper, finely diced

Using the same pan as the chops, turn heat to medium-high and cook the onions and garlic for about 2 minutes. Toss in the peaches, allspice, white wine vinegar and lemon juice and cook an additional five minutes or so. Top the chop with the peach mixture, drizzle lightly with maple syrup and sprinkle with the red pepper. The pepper is, I suppose, optional, but it look so pretty!

When I was a kid we visited my Uncle Doug with some frequency, and he only owned two movies from what I can remember. The first was The Good, the Bad, and the Ugly, which didn’t appeal to me for more than five minutes at a time, and the second was Fried Green Tomatoes. Yes, it is a chick flick, but it’s also a dark period film, and at the time that shit was directly up my alley. Oh, who are we kidding, it’s still up my alley.

In college, I took a food lit class and this was also on the required reading. Turns out in the book there’s a little bit more of a lesbian bent. Who knew? Whatever the case, I digress. It all comes down to I saw green tomatoes at work, and decided to try something new. In addition to the food itself, check out the results of my fancy little light box!

Look at these babies. Just beautiful, the color.

edited - fried green tomatoes

Green being my favourite colour, this was practically a religious experience visually.

edited - fried green tomatoes

This isn’t sandart, it’s just the underwhelming breading for these things.

edited - fried green tomatoes

And here they are, fried green tomatoes!

edited - fried green tomatoes

These were really just okay, which surprises me in a way, considering how much oil went into them, but not in other ways, like it’s a southern dish. I could see these being excellent with seasoned breadcrumbs, but I’m not a big fan of cornmeal without something punching it up a bit, and needless to say, the tsp of paprika really didn’t cut it. That said, I made an attempt to salvage this experiment.

edited - fried green tomatoes

Yep, you can make anything into a pretty good sammich. This one features arugula, cheddar, red onion, and mayo. My research tells me that green tomatoes are indeed just red tomatoes that haven’t had a chance to ripen yet. I thought maybe they were some kind of varietal. Maybe I’ll try fried heirloom tomatoes one of these days.

If you are interested in making your own, here’s a recipe from Epicurious.

Subscribe to Omnomicon