online poker

Omnomicon

say it with me now, “om nom nom”

Hello!

Let’s make a shrimp ceviche today. It’s light and delicious and awesome for a dinner party . . . you can make it the day ahead and serve as an impressive appetizer. I’ll be honest, this was inspired pretty directly by Mezcal Cantina, a prime example of the fine dining that surprises the Worcester visitor who isn’t scared away by gang warfare.

Okay, I exaggerate, but that’s the unfortunate perception.

This recipe has all the good, normal, safe ceviche stuff: cilantro, lime juice, shrimp, hot peppers (in this case, serrano), and red onion. And then there are some extra ingredients that make it extra special: sweet potato, coconut juice (also called coconut water, and definitely NOT coconut milk, which is much thicker), toasted coconut as a garnish, and the big un: TEQUILA! Let’s get all crazy on this ingredient list.

Here we go!

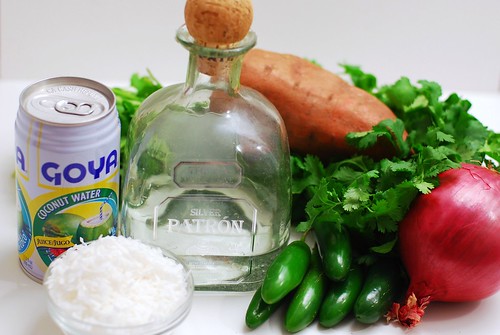
And the one ingredient I couldn’t fit in the same shot as the Patron.

DSC_0081

The tequila isn’t alcohol-y, the peppers give just a hint of spice, and the sweet potatoes are so uninterruptive to the flavour as long as they’re cooked enough.

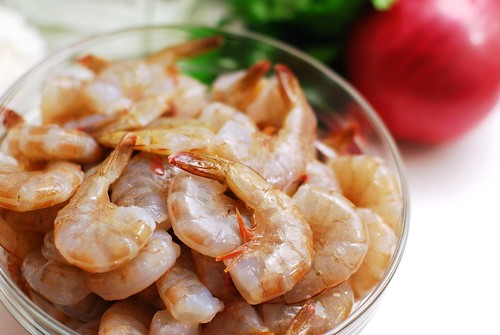
In a true ceviche the raw shrimp is “cooked” by the lime juice. From what I understand, most shrimp is flash-frozen before it’s even off the boat, so this is probably a safe method. Even still, I feel a little weird about it, even though I know the texture is divine. So as a compromise, I lightly steamed them in their shells.

DSC_0096

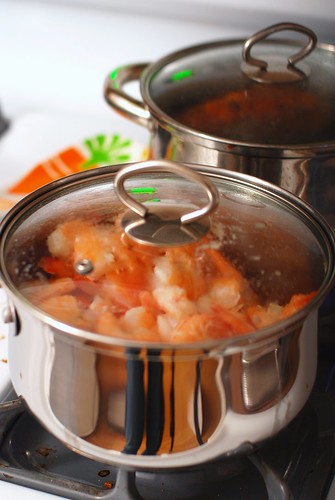
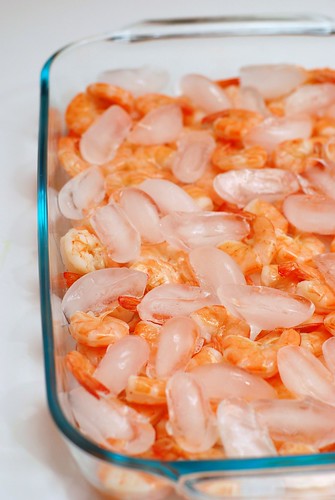
Immediately chill to cease the cooking process.

DSC_0106

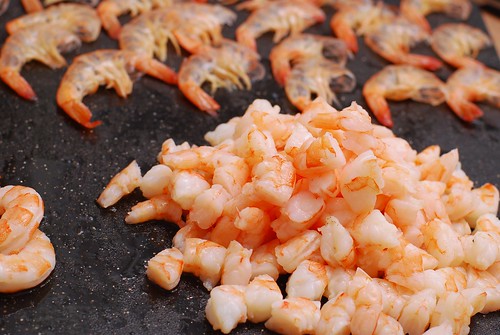
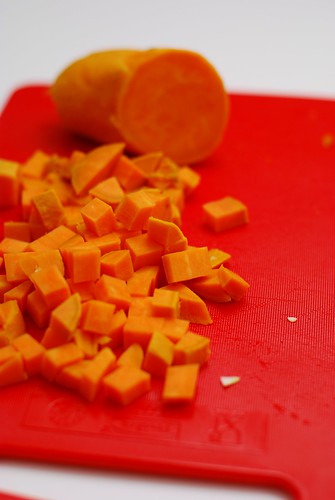
Now chop the shrimps in thirds. And anally arrange their shells in the background there.

DSC_0112

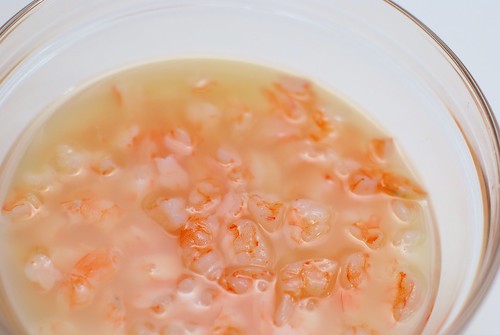
Steep in lime juice in your fridge for about an hour.

DSC_0173

Boil the sweet potato (I guess it’s also called a yam?) for 25 minutes, then chop into 1/4 inch cubes.

DSC_0156

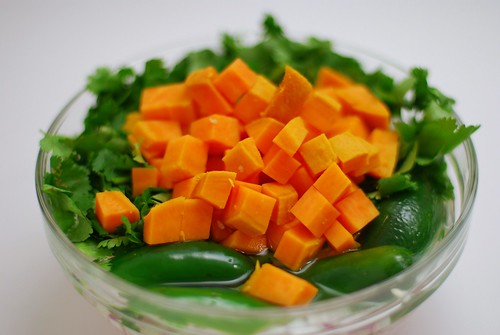
Strain the coconut chunks out of the coconut juice. I see no reason not to leave it in, but the juice really does the job as far as flavour.

DSC_0130

And cilantro and serrano peppers and sweet potato and the coconut juice and of course, a shot of tequila.

DSC_0165

Chill that business for an hour as well. In the meantime, toast some coconut.

DSC_0175

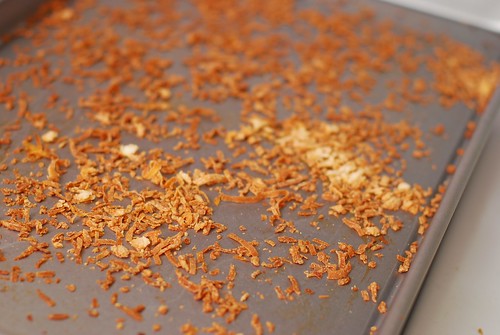
And oh man, just look at that.

DSC_0150

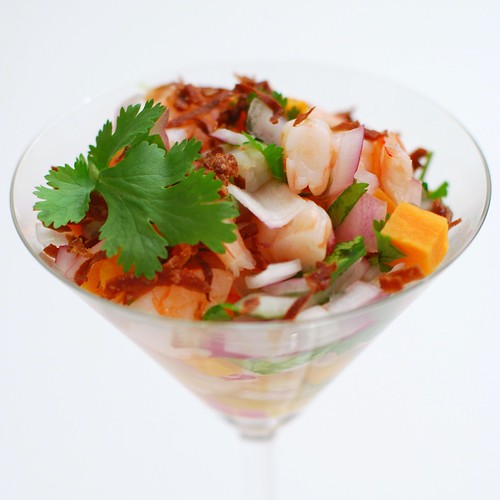
It’s as delicately delicious as it looks. Promise.

Coconut Sweet Potato TEQUILA Shrimp Ceviche
inspired by Mezcal Cantina, Worcester, MA

1 lb thawed raw shrimp, tails on
about 10 oz lime juice
1/2 sweet potato
1 small red onion, chopped finely and rinsed
2/3 c chopped cilantro, plus more for garnish if desired
2 Serrano chiles
1 can coconut water (also called coconut juice, and again: do not use coconut milk)
1 shot tequila of your choice . . . and Patron is CHOICE!
1/4 c coconut, toasted

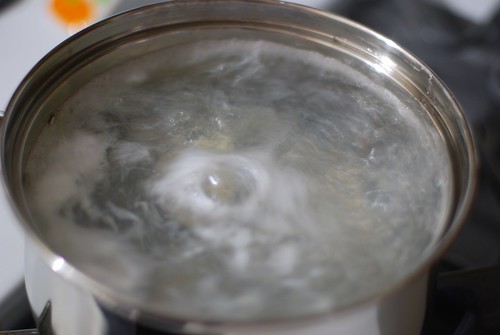
First, boil a pot of water, drop in a scrubbed sweet potato and let boil for 25 minutes. When it’s done, let it sit in a strainer for a little while to cool off.

A note on the shrimp: if you don’t care the difference, feel free to use thawed, pre-cooked shrimp. But I would assume you’re only doing that because you’ve never cooked raw shrimp yourself and therefore don’t know that it is about a thousand times better. Here’s how to do that:

Bring a medium pot of water to a boil. Drop the shrimp, leave it in there for about two minutes, then skew the lid and drain the pot, leaving the shrimp inside. Let steam in that manner for 8-10 minutes, depending on how nervous raw shrimp makes you. Pour shrimp into a shallow dish and litter the dish with ice cubes to stop the steaming. Once cool, shell and chop into thirds. Put the shrimp in a bowl and cover with lime juice. Chill in the fridge for 1 hour.

Next!

Finely chop the red onion, then rinse in a strainer; this seems to keep the flavour milder. Roughly chop 2/3 c cilantro. Cube half of the sweet potato into 1/4″ cubes, discarding any cubes that still have a crunch to them. Slice the serrano chiles in half, but don’t chop them up . . . they’re just lending flavour to the juice, we’re not putting these in our mouth.

Strain the coconut water into a bowl, add the tequila, stir, and then add the onions, cilantro, sweet potato and chiles. Stir to mix, then fridge it for an hour.

While you’re waiting the practically unbearable hour for all that stuff to mingle, clean your kitchen and toast the coconut. Sprinkle the flakes on a cookie sheet and place in a 300o oven for 5-10 minutes. They’ll look pretty browned, but you really just want to make sure they don’t outright burn. See the picture, this coconut was perfect.

Strain the shrimp, reserving about 1/4 c lime juice. Throw the shrimp and the reserved juice in with the onion/cilantro mixture.

If you’re really looking to impress, serve in a margarita glass. If you’re like me, who drinks iced margaritas out of pint glasses, serve in one of your three martini glasses.

Either way, sprinkle with the toasted coconut, garnish with with some extra cilantro, and serve.

Aaannnndddd, she’s back!

So I did mention something about health and/or diet food in my last post, and while this recipe is the latter, it is most certainly not to be confused with the former. I posted about my rainbow cake here, and it got a lot of traffic on over to my livejournal, and everyone wanted the “recipe.” The cool thing is that if you’re making something so distractingly colourful, people will think it’s delicious no matter what.

This presents me with the option to use an old Weight Watchers trick—the one-point cupcake. Except I’m making a cake and I created my own frosting. Kinda. I’ve seen it done before, but I swear I made it up first!

This cake is suitable for many occasions:

  • A child’s birthday
  • Your mom’s birthday
  • Coming out to your conservative parents
    • If you’re a lesbian, they’ll be thrilled that you won’t be forgoing your feminine kitchen duties.
    • If you’re the kind of gay dude who makes cakes for your parents, they were probably on to you anyway.
  • Coming out to your conservative parents on your mother’s birthday
  • Your friend’s jam band CD release party

. . . so I’m sure you’ll find a use for this recipe soon.

And of course, you can use any white cake recipe you’d like. This is just how I make it because I have delusions of wearing size 2 someday.

Oh yes, and do me a favour: DOUBLE THE RECIPE AS PHOTOGRAPHED HERE!! The recipe at the bottom is accurate, but this made for a really REALLY small cake, and there was not nearly enough frosting, especially considering its lightness.

Okay, on with the ingredients.

how to: rainbow cake!

That’s all. Notice the lack of fat in here? Mmmmmm . . . chemicals. Though I don’t need to defend my method thanks to the double-dub (WW) aspect, even when I make a “real” cake I usually use box mix because let’s face it: Betty’s been doing it way longer than I have, and has pretty much perfected the art.

Pour a can of soda (12 oz) 2-12 oz cans of soda into the cake mix two boxes of cake mix. No eggs, no oil, no water, no sweat.

how to: rainbow cake!

The action shots weren’t too thrilling. Now we measure it.

how to: rainbow cake!

I’m going to round to 30 oz 60 oz because I have six colours and isn’t that just too convenient? It worked out to 3/4 c 1.5 c per colour, measurementwise. So I divvied that up and used my gel colours.

how to: rainbow cake!

(the gel colours, while not as good as pigment dye, are much bolder than the very liquidy food colouring you probably grew up with)

how to: rainbow cake!

The first colour you drop into the pan, use about 2/3 of the mix for that colour. Otherwise, the top (last) colour will really dominate. I used a heaping 1/4 c 1 cup of each colour.

how to: rainbow cake!

Drop the colours, one by one, into the middle of the pan, in neat concentric-ish gobs. Remember the cake is going to be sliced in the side there, so mixing it around on top isn’t going to make your slices any more psychedelic (trust me, I did the three-dimensional thinking for you already).

When you’re three colours in, start doing the reverse with the other pan. Since I’m going in rainbow order: red, orange, yellow, green, blue, purple, I got from red to yellow in the first pan, then purple, blue, green in the second. This is so that your two pans are equal if your measurements aren’t exact (and they’re not likely to be).

how to: rainbow cake!

Now finish up.

how to: rainbow cake!

Follow the box’s baking instructions and do your dishes.

how to: rainbow cake!

Such lovely dishes!

Now for the frosting: 1 box 2 boxes of fat free sugar free pudding mix, and 8 oz 16 oz (two of the 8 oz tubs pictured) of fat-free whipped topping. Or sugar-free. Or light. Or regular. They’re all pretty much the same. But that’s it.

how to: rainbow cake!

Holy shit, the cake’s done! Toothpick clean and everything! Get that shit out of the oven!!!

how to: rainbow cake!

The purple top kind of made a little turkey silhouette.

how to: rainbow cake!

The frosting will be a little tough to spread, so treat it like a buttercream (I guess, I’ve never frosted a cake with buttercream). Putting gobs all over, then smoothing in worked well for me.

how to: rainbow cake!

And look at that thing! It’s so pretty-lookin.

how to: rainbow cake!

Here’s what this particular cake looked like. See how it’s tiny and too rounded and it kind of isn’t all that great? That’s because I didn’t double the recipe. It’s a mistake I’ll only make once.

how to: rainbow cake!

Here’s what that really should look like: same process, twice the batter.

DSC_0598

Mmmmm.

Sunny Day Rainbow Cake

2 boxes white cake mix
24 oz of clear diet soda (2 cans, ginger ale and sprite work well)
gel food colouring
16 oz whipped topping
2 oz instant fat-free sugar-free pudding mix (2 smallish boxes)

The Dieting
Mix the cake mix with the soda according to regular instructions on box. It will be lumpy afterward. Again, you can use any white cake recipe you want, this is just how I do it.

The Rainbowing
Measure the total volume (by my estimate, 64 oz), then divide by 6 and measure into separate bowls. There are 8 oz in a cup, so 64/6 = 10 to 11 oz, or 1 cup + 2 tbsp.

Stir colour into each bowl with its own spoon. For the first colour into the pan, measure out 2/3 to 3/4 of your mix (in this case about 1 c) as close to the middle as you can. Drop in your first three colours, then work on the other pan with the last three colours. So if you’re doing rainbow order, the first pan should have red, then orange, then yellow, and now the purple, blue and green go into the second pan. As a recap, this is so both layers are roughly the same size.

Bake the cake for however long the box tells you to bake it. Check it when the box says to, but usually it’ll need an extra 5 or 10 minutes or maybe more because of the density of the soda method. Just keep baking, checking back every 5 minutes or so until a toothpick to the center comes out clean. Let cool completely before moving to a wire rack.

The Frostinging
Meanwhile, make your frosting. Just mix the pudding mix in with the whipped topping for a few minutes. Dye if you’re into that.

Frost your fat-free cake with your fat-free whipped frosting. Eat.

Edit 1 (one week later)


No children were harmed in the making nor consumption of this cake.

People seemed to miss the point that I am a 25-year-old woman on a diet with no kids. Since kids don’t really need fat-free anything, there’s no need to use the soda recipe if you don’t like the idea, and if you don’t like dye, don’t make this for dinner for them every night for a month. Okay, folks, thanks for the allowance to disclaim.

Edit 2 (two weeks later)


A note to Weight Watchers (the people on the diet, not the company):
WW has long advertised 1/12 of a cake mix with diet soda to be a “one point cupcake.” I have no idea why they insist this is the case when according to the “as packaged” nutrition information, this much cupcake has 170 calories, 3g fat and no fiber . . . by my calculation, that’s 4 points. That said, 1/12 of this recipe, (2 box mixes + 16 oz whipped topping + 2 oz or so pudding mix) works out to 10 points a slice. Not bad considering that a comparable cake would be 14 points.

Edit 3 (two months later)


FAQ
Here are questions I get over and over again about this cake. I just don’t want to answer any more emails about it. These questions apply to any cake, so please don’t blame your epic fail on me.

Omg my cake burnt!
Next time don’t bake it for as long.

My cake stuck to the pan!
Grease your pan better next time.

My cake burnt/stuck to the pan/was underdone/crumbled. Is this because of the food colouring I used?
No, the food colouring has nothing to do with the failure of your cake. You baked it too long/didn’t grease enough/didn’t bake long enough/moved it before it was cool.

I’m making this for my kids, can I use non-diet soda for this cake?
I don’t know why you would, you certainly wouldn’t be saving much in the way of calories, and I don’t really think your kids need more sugar. Just make a regular cake and then put food colouring in it, it will look the same, promise.

If I don’t make it with soda, will the colours run?
No. In fact, like I keep saying, please just use whatever the hell cake recipe you like. Please. The rainbow part has nothing to do with Weight Watchers.

The frosting, it’s so thick!
Yes, buy a tub of Duncan Hines frosting as a backup plan.

The cake, it fell apart!
Let it cool before you move it, and more importantly, don’t jostle the thing about.

I don’t like the cake this made, blech!
You probably aren’t on a diet, so I don’t know why you bothered to make diet cake.

I don’t get it, you make two cakes and then you put them on top of each other?!
Yes, it’s called a layer cake, and pretty much any cake you buy at a grocery store is constructed in the same manner.

But I don’t *like* food colouring.
Well, you’re wasting your time reading this, aren’t you?

I totally saw this on Something Awful’s Goons with Spoons Rainbow Cake thread, way to steal the idea, asshole.
Me too, fellow goon, me too. And in fact, I posted my original rainbow cake there. If you have no idea what I’m talking about and would like to see about a hojillion rainbow cakes, and a rainbow cheesecake, please check out the thread that put this on my radar.

DSC_0603

9/26/2014
closing comments because way more spam bots are hanging around than humans, and after at least 2000 actual people comments, there probably isn’t much left to say. however, my email address remains active, so if you wanna be social, send it that way.

thanks, internet, this was fun.

Dec-31-2008

new year’s and the last six weeks

Posted by aleta under an aside, recipe fail

Hello folks!

So after receiving many lovely, flattering blog awards from blogs that I happen to frequent (which makes these compliments especially flattering), I dropped off the face of the internet to pursue everything else in my life. This is not particularly surprising, as my attention to new hobbies tends to wax and wane and eventually bombs out altogether.

However, since I always have to make food, and also because I got a new Nikon D40 for Christmas (my very own–previously I’d been using Dano’s camera), I declare this blog not dead! The biggest obstacle for me has been the lack of natural lighting. Though I fancy myself a decent photographer, I’m not a talented lighter, and a good recipe with crappy photos is just plain not acceptable. So one of my many goals in the next year is to update once weekly, which gives me the opportunity to shoot on the weekends until the days are long enough to accomodate evening shoots.

I’m marrying this goal to another: lose 10-15 more lbs. At this point, it’s just icing on the cake, so to speak, because I’m already at the weight I wanted to be a year ago, but I know I can do it and it’ll still put me well within healthy limits. That said, my baking has been the biggest obstacle to overcome, and I’ll be focusing on lower-calorie recipes in 2009. Even though high-fat, absurdly rich foods really do take the loveliest photos.

So I leave you with these resolutions, and a photo from a shoot last summer that amounted to a moderately tasty corn chowder and a bunch of unusable shots thanks to unnatural lighting.

Corn.

Tags:

I’m back! Did you miss me? I was all sickly and working a bunch all last week, and therefore far too lazy to even clean my house, let alone post blogs. But no worries, I have a treat.

Who doesn’t love chai tea? Hint: it is not me who does not love chai tea. I had never enjoyed this delicacy until I had a meal card in college with a chai tea machine in the food court. And it was love.

Over the summer this supply dried up, so I went to Campus Convenience (aka Campco) and inquired as to whether one might find chai tea somewhere in the store. The new owner, who was incidentally Indian, directed me to a shelf with some black tea on it. “No no, like . . . chai . . . it’s got milk and honey in it?”

“But, this is chai”

“Um, well, what I’m looking for comes in a carton?”

“Chai is an Indian word that means ‘tea.'”

“OH.”

And thus ended one of many cultural lessons that naturally befall a white middle-class suburban girl from New Hampshire sooner or later.

And look! Just five years later, here I am, so culturally learned that I not only eat Pho on a regular basis, but am making my own chai tea. There are dozens of recipes out there, so I kind of mashed them all up to create an optimal mix of things. Fortunately, my experiments in Pho leave me with pretty much all the ingredients on hand!

For one, cardamom pods.

Cardamom pods!

Did you know the best way to get cardamom flavouring is to smash open the pods? It’s true! I read it on the Internet. I guess outside of the pods, the seeds don’t retain their flavour very well.

The pod reveals all.

I assembled the other spices, shying not away from traditionally savoury spices such as fennel and black peppercorns.

These are our spices!

Float your tea bags atop some milk. Many folks like the creaminess of whole milk. I used 1% because the cooking of it thickens it quite a bit, and more importantly, I’m totally on a diet.

Floatin.

Then you stir continuously while it comes to a boil. Then you simmer. And then you simmer some more. In fact, the longer you simmer, the spicier it becomes. Perhaps less cardamom is better if you’re planning on spicing it to the max.

The phases of brewing this business.

Strain. I doubly strained this because cheesecloth is a pain in the ass sometimes and also, this strainer is not nearly stringent enough to get those itty bitty tea leaves that burst out of those cheap tea bags.

Strained.

After some chilling, I iced that business and enjoyed it with some fine biscuits I found at the Indian store while in search of bulk black peppercorns.

Mmmm . . . chai tea!

And that’s that! I made a half gallon of tea for sharing, but the recipe makes a quart.

Chai Tea

2 tsp fresh ginger, smashed via mortar and pestle or otherwise minced
4 bags of black tea
2 cinnamon sticks
1 tsp fennel seeds
4 whole cloves
8 black peppercorns
4 cardamom seeds
1/4 cup honey
1 quart of milk (your choice of fat content–that’s 4 cups)

Pour milk, spices and honey into a saucepan, float the tea bags on top, and let come to a boil while stirring continuously. Reduce to a simmer (continue to stir) and let simmer for 10-15 minutes. Simmer for longer for a stronger flavour. Turn off heat, let sit a few minutes. The milk will get a skin on top of it; skim and discard. Strain through a fine mesh strainer lined with cheesecloth if you have it. Serve hot, or chill and serve with ice. And delicious sunshine biscuits

The holidays, as far as I’m concerned, are over. That’s because, to me, Halloween is like Thanksgiving, Christmas and New Year’s Eve all in the same day. Just awesome. I also tend to throw caution to the wind with one hand, while unwrapping and cramming fun size bars and waxy orange sugar into my mouth with the other. This would all be well and good if I were one of those people who can eat forever and never gain weight, but sadly, I am not, and if I’m not losing weight, I’m gaining it. As such, I’m back on the wagon.

Now I’ve heard that it’s in poor taste for a chef to discuss calories (and if I could find that quote I might even link someone), but my foodie license feels a little safer knowing that I regularly blog baked goods that are not safe by the stretches of any diet’s imagination. And you know, even though *I* am a little calorie-conscious, that doesn’t stop me from reading all manners of delicious baking blogs (among my new favourites is Patticake), and I get really excited when I see something low cal enough to eat for dinner.

And this brings us to POACHED EGGS.

With a little somethin-somethin.

What are we making today?

In this case somethin-somethin is a combination of a light (90 calories! 9 grams of fiber!) English muffins, fat free plastic American cheese (30 calories! No fat!) , a real live egg (twice the calories of the fat-free version, but it pays off here), and sliced ham, which is surprisingly not-that-bad-for-you (30 calories, just 1.5g fat). And then an attempt at veggies, a la the ever-versatile tomato and onion.

Egg.

To poach an egg is a special process, and Smitten Kitchen goes through it pretty thoroughly at that link. My strategy involves the following

  • put your egg in a little dish before putting it in the water
  • having the water boiling pretty furiously when I throw the egg in, then immediately turn it to medium-high
  • stir the water so it’s got a good whirlpool going and the egg has a chance to curl in on itself
  • cook for only 1.5 minutes so as to preserve as much of that beautiful gooey egg yolk as possible

You can’t see it, but there’s an egg cooking here.

That's an egg poaching.

Then stack that thing on an already-high stack of the other stuff, and uh, voila! Diet dinner.

Poached egg bonanza!

Put whatever you want on there, and even on your plate. It’s your dinner, and your eggs. Everything tastes especially yummy coated in that delicious creamy egg yolk which, for the calories, is a pretty good deal. You don’t have to be a dieter to appreciate this dish.

So what do you do with your poached egg, the creamy caviar of eggs that don’t belong to fish?

Also, a note on fat free fake cheese: don’t knock it til you try it melted on something. And of course, you can use whatever cheese you want.

Nutrition Information for Dieters
as pictured

230 calories
5.5g fat
9g fiber
4 weight watchers points

As much as I’ve tried to start eating more in season this year, there are always exceptions to the rule. Perhaps it was the density of the pierogi lasagna sitting in my tummy three days later, but something, at any rate, made me crave a light treat with no guilt involved.

Naturally, fruit salad was the answer. Of course, fruit salad is just whatever fruit you want in there, but I have special preferences. For one thing, I hate cantaloupe, it’s filler and that’s a fact. On the other hand, honeydew melon is pretty yummy and serves the same purpose. Citrus fruits don’t fare well, blueberries are too small (and expensive 90% of the year), grapes dominate your palate when they explode in your mouth, and apples are too crunchy.

So what fruits are appropriate? I’M GLAD YOU ASKED, HERE LET ME SHOW YOU.

Before.

Since the honeydew is filler, we’ll start there. I totally love using an ice cream scoop on these, it’s so satisfying somehow.

Ice cream scoop.

Now slice up some kiwis. They have a totally cool aesthetic.

Kiwis!

Now pair your green fruits.

The greens.

And for the special ingredient? I throw some frozen raspberries in there. They’re awesome because when they melt they coat the honeydew in a tart envelope of juicy deliciousness, and they go a lot further than fresh raspberries, which fall apart anyway. Since I’m already making this out-of-season, I have no regrets doing this.

Frozen raspberries.

Strawberries are also show-stoppingly beautiful. *Rowr*

Sliced strawberries.

You may have been wondering what the lemon was doing kicking around up there in the first shot. All like “Oh hey guys, having a salad? Mind if I crash it? Yeah, I’ll just be right here if you wanna talk or something. Cool.” In addition to preventing that brown crud on apples from forming (hello oxidation!) it also keeps your salad a little bit longer, and since we’re going for something tart anyway, it certainly can’t hurt. But even if you opt for a sweeter blend of things, you won’t notice the juice in there, promise.

Layers.

Isn’t that so pretty? Now fuck it all up with a good sound stir. I like to give the fruit some time to chill in the fridge to allow the raspberries to do their thing and the other fruit to do a little mingling (yes, you too, lemon). This has the unfortunate side effect of making my final shot way uglier than any of the previous. So save your inferior fruit salads for company, this is the one you can go home to, like an ugly wife.

As for the bananas, don’t mix them in with the other fruits. Just, don’t. They get gross and mushy and don’t store the same way as the other fruits. But right before you dig in, throw a few slices on there. It brings the whole thing together.

After.

Tart Fruit Salad now with raspberries!

1 honeydew melon
4 large kiwi fruit
about 6 oz frozen raspberries
1 lb strawberries
juice of one lemon (2-3 tbsp)
4 bananas

Slice all fruit but the bananas, toss them in a large bowl with the frozen raspberries and lemon juice. Chill 1 hour. Before serving, give it another stir and add sliced bananas to the top.

Eat with the confidence you gain from knowing it won’t go to your hips.

Just like your half-Polish, half-Italian grandmother used to make!

Everyone who’s ever had pierogies loves them. Unless they don’t like potato, cheese, pasta or butter, in which case they are clearly mad. I have yet to make pierogies, but I have a little ace up my sleeve called pierogi lasagna. It’s very easy, if time consuming.

Recovering carbophiles may wish to avert their eyes, lest they become entangled in the enticing mesh of potatoes and pasta. On the other hand, this dish is relatively low fat (remember, the butter is being distributed among 12 servings, and I found that fat free cheddar did the trick quite adequately), and they sit like a brick in your stomach, so you’re not likely to want more than one piece of the stuff.

We begin, predictably, with potatoes. These are some of the most beautiful reds I’ve seen in a long time.

Red potatoes.

The skin was so lovely, in fact, that I left it on. That’s my usual preference anyway, though.

Red potatoes: mashed.

Stir in some cheddar and sour cream. I left out the butter, for now.

Red potatoes: with cheddar.

Sautee a sliced onion in a 1.5 sticks of butter. This is why there was no butter in the potatoes.

Onion: sauteed.

Now we begin the lasagna part of all this. Spread a little onion-butter on the bottom of a 9×13 baking dish.

9x13 baking dish: buttered.

Lay down some noodles.

Noodles.

Spread potatoes little by little. It helps to drop a dollop, then spoon it out, working row by row along the noodles.

Potatoes.

And then some onions and butter on top of that.

Onions.

Repeat that a few times, then top with noodles and the rest of the butter and onions. There should be more of this stuff on top than in any of the layers.

The top!

Bake for 20 minutes and you get this.

Pierogi casserole, baked.

Use your baking time as an opportunity to fry up some kielbasa. Enjoy the hell out of it.

Mmmmmm.

Pierogi Lasagna

1 lb lasagna noodles
4 lbs red or white potatoes
1/4 c sour cream (optional)
1/2 c milk
2 c shredded cheddar cheese
3/4 c butter (1.5 sticks)
1 onion, sliced in rings

Cook the noodles. Chop potatoes into 1″ cubes, place in pot of cold water (enough to cover), and allow to come to a boil. Continue boil until potatoes are soft enough to yield to a fork stab. Drain, mash, blend with a mixer. Toss in the optional sour cream and milk, mix some more. Add salt to taste. Stir in cheddar.

Melt all the butter over medium-high heat, then sautee onion until the rings no longer hold their shape.

Preheat oven to 375. Grease the bottom of a 9×13 baking dish with some of the onion-butter. Lay noodles on the bottom of the dish, then spread the potatoes, a dollop at a time, along the length of each noodle. Once done, smooth the potatoes, then spread about a quarter of the onion on top, and drizzle a small amount of butter as well. Repeat this twice (or more if your dish can accommodate), then top with noodles and the remainder of the onions and butter.

Pop in the oven for 20 minutes. Allow to cool 10 minutes before cutting and serving.

You guys, you guys. Have you ever been to a music festival? In addition to beats, good company, crappy camping and hippies, they also feature food vendors. And this is how I discovered The Skinny Pancake, a Burlington VT original. I haven’t yet made a pilgrimage to their restaurant (Vermont is kind of a hike from Massachusetts), but they have some incredible crepes that you can recreate at home without tie-dye bedecked strangers eyeing your breakfast.

First, we have The Heartbreaker.

Nutella, you are amazing.

I think you can see where we’re going with this. My crepes are not like those served by the Skinny Pancake, but they still benefit from nutella, strawberries and bananas. And apples too . . .

Like an umami commercial.

. . . but we’re getting to that. Now mix up your favourite crepe batter.

The only acceptable use of a whisk.

And let it stand, covered with plastic wrap, for 30 mins before go time. On a side note, I fucking hate whisks, but crepes are the one food item they serve well instead of becoming a clumpy hard-to-clean nuisance. When the time is right, heat up 1/2 tsp of butter in your largest skillet, and pour enough batter to cover the bottom without the batter on top being runny.

Ooozy.

Do a little swishy swishy with your pan, and pour back to the bowl whatever isn’t stuck to the pan. When your crepe starts to bubble and the bottom of it is browned, give it a flip. This will happen a minute or two after liftoff.

Hungry yet?

Now immediately, I reiterate, immediately get about half a tablespoon of Nutella on there. You want this to get melty, and the longer it’s on your crepe, the meltier it’ll get.

Just a little bit of nutella . . .

And then toss on your strawberries and banana. You don’t want a lot of these, and you’ll see why, looks like I used about 2 strawberries and one third of a banana.

Now bananas and strawberries.

Now give that side a minute or two to cook, then begin the folding process.

Ice cream cone fold.
Triangle hat.

You want a tri-cornered hat looking thing reminiscent of colonial America. And this is the reason you want to go light on your fruits, it won’t fold up right if you aren’t conservative. Now flip that monster over for about thirty seconds to let the oozy coat the other side of the crepe.

Flip for just a moment.

Serve to your favourite breakfast guests.

DONE!

We’re almost done! The Green Mountain crepe was a big hit festivalwise as well, so I did that one too.

Apples & cheese.

Your story starts out the same, and, as with the Nutella, you wanna get your sharp cheddar slices on there immediately after flipping and for the same melty reasons.

Now the savory crepe.

Now the apples.

Tart apples and sharp cheddar. Classic.

Do your foldy bit.

Foldy fold.

And you know the rest.

DONE AGAIN!

Do you put anything cool in your crepes? Do you have an excellent crepe recipe to share? Please do! I have a feeling these are going to be a Saturday morning tradition for some time to come, and will try anything that sounds reasonably delicious.

As a wee lass, my mother would, from time to time, break out the box of lemon poppy seed muffin mix and proceed to make muffins on a Saturday morning. I never really understood *why* this was a big deal, other than it had these weird black things in them. At the same time, I ate these with some relish and with two visitors arriving Saturday afternoon (including Dano’s banjo teacher), I got the bug to make some muffins. These popped into my head, though I wouldn’t be doing it with a mix.

I got the recipe from eat me, delicious, and it’s her take on Dorie Greenspan’s recipe. I agree with her preference for sour cream (density) and personally, I like butter in muffins instead of oil–the latter seem to end up soggy.

Armed with a lemon, some poppy seeds and fat free sour cream from Stop & Shop, I set out to create heavenly lemony delight. This is a really beautiful recipe, start to finish.

Zesty!

Fun step #1: blending the zest with the sugar with little pinches.

Finger the zest into the sugar.

Add some flour and leaven (this isn’t the pretty part yet, we’re getting there).

Flour and zest.

Wet stuff (shout out to fat free sour cream: Lookin good lady!).

Wet stuff.

Oh man, by now I’m impatient for the licking of the bowl ritual.

Mmmmm.

Enter poppy.

Enter seeds.

I bet you’re totally into this by now. I told you, heavenly! Like, when I think of heaven, this is what the clouds we’re all walking on look like.

Oh batter! I can't wait to lick you off the spoon!

Now I’ve always wondered what’s truly better: buttered muffin pan or muffin cups? I like the muffin cups at this stage . . .

Paper.

. . . but the boys and I agreed that for eating, for eating specifically these muffins? They need to be au natural.

Butter.

eat me, delicious’s adaptation of Dori Greenspans’s Lemon Poppy Seed Muffins

Oct-16-2008

spent grain chocolate chip cookies

Posted by aleta under sweets for sharing

Lookit what I got!

Spent grain.

In case you aren’t a homebrewer, that there is spent grain. This is what’s left after you brew the beer (but before it ferments), and it’s often used as fertilizer, mulch or animal feed. But it’s just grains, full of fiber and totally good for you, so my pal Heather filled up a nice big bag for me to play with. What a doll!

I found this recipe and tried a couple batches. The first was the recipe as written (which includes peanut butter—not my favourite), and the second was my little take, sans peanut butter and nuts. And the winner is . . . definitely the recipe as written. Mine came out dense and I daresay even fudgy, but not the good kind like you want. Also, the peanut butter doesn’t shine, it just adds to the nuttiness of the grains, and though I could probably work out some butter in its place, I would make this with peanut butter again. I did replace the oil with butter because I think it makes things a little fluffier and I felt these ran the risk of being too dense. But these tasted like super-earthy oatmeal cookies. I used only whole wheat flour and it didn’t even taste like dirt!

And hey if you don’t have access to these, no worries! I would imagine this recipe would work well for any grain mixture you might prefer. I’m thinking of bulgur in particular, but I’m not big on grain cereals. Since these grains are wet when they go in the recipe, make sure yours are cooked (and wet) before you measure them and toss them in.

Let’s take a look!

It begins.

Say what you want about the taste and calorie content, peanut butter is beautiful. Onto the dry ingredients.

Now the dry stuff.

At this point, I felt like it was time to spread these on a pinecone, and was a little skeptical about the recipe.

Batter.

These are generous tablespoons smushed down just a little bit so they’ll have a nice cookie shape.

Plop down generous tablespoons.

My MY aren’t you all so lovely.

Hey kid, cool it!

Enjoy!

Tender, cakey, delicious, healthy.

Nutty Spent Grain Chocolate Chip Cookies
Adapted from a recipe featured by Seven Bridges Cooperative.

1/3 cup peanut butter
2 tbsp melted butter
1 cup sugar
1/3 cup milk
1 tsp vanilla
1.5 cups spent grains (or alternatively, 1.5 cups of your favourite grain meal, prepared and still wet)
2 cups whole wheat flour
1 tsp baking soda
1/2 tsp salt
1/2 cup chocolate chips
1/2 cup chopped nuts

Mix in the peanut butter, regular butter, sugar, milk and vanilla. Then add the flour, baking soda and salt. Once that’s all mixed, stir in the nuts and chips.

Bake on a greased cookie sheet at 425F for 8-10 minutes until the tops are just getting golden, but before the bottoms burn. Let sit on the pan for about five minutes before transferring to wire rack to cool. Serve with love.

Makes about 2 dozen cookies after batter sampling.

Subscribe to Omnomicon